This is the multi-page printable view of this section. .
AGW features
Last updated:
- 1: Custom agents
- 2: Agentflow
- 3: Shared context across agents
- 4: Image input
- 5: Memory: preferences and project knowledge
- 6: Plan and Execute modes
- 7: Structured responses with JSON Schema
- 8: Tool approval
- 9: File browsing and Git change review
- 10: Multiple clients
- 11: Third-party account sign-in
Explore eleven ways AGW supports everyday work. Each page explains a use case, where to start, and the limits to keep in mind.
1 - Custom agents
Last updated:
Define an agent for your task
In AGW, you can combine a model, instructions, and tools into a reusable agent. It assesses the task and context, selects available tools to act, and uses the results to continue its work.
For example, create a documentation reviewer that reads material, identifies unclear passages, and suggests revisions. Add the appropriate tools and permissions when it needs to edit files directly.
What you can customize
| Setting | What it determines |
|---|---|
| Model Provider | The model used to understand tasks and generate replies |
| Instructions | Role, scope, processing requirements, and output format |
| Tools and Skills | Available operations, task guidance, and capabilities |
| Configured integration connections | External services or accounts the agent can access |
| Response Schema | Whether replies return structured data that follows a JSON Schema; see Structured responses with JSON Schema |
Create agents for organizing material, explaining code, and reviewing results. Select them in Chat for individual tasks, or use them as execution steps in an Agentflow.
Get started
- Prepare a working Model Provider and create a custom agent in Agents.
- Select the model and define its role and output, such as “Review documentation and list the original text, issue, and suggested revision.”
- Add the required tools, Skills, or configured integration connections. Check the Project workspace for file operations.
- Save and enable the agent, try a short passage in Chat, and inspect its reply, tool calls, and actual results.
From one agent to a defined process
An individual agent can decide how to complete a task within its role. When every run must follow explicit steps, such as organizing material, reviewing it, and requesting human confirmation, use Agentflow to arrange those steps.
An agent’s access depends on its configured tools and permissions. Instructions do not grant access to files or external services. Model judgments and execution results still need verification.
2 - Agentflow
Last updated:
Arrange defined steps into a workflow
Agentflow means Agent Workflow. Agents reason and act; Agentflow routes work and executes predefined steps. Connect nodes on the canvas to define what happens first, who receives each result, and where human confirmation is required.
For example, an organizing agent decides which information to retain, and a reviewing agent checks for omissions and unclear wording. Agentflow sets the sequence: organize, review, then request human confirmation.
flowchart LR
    I["Input: source material"] --> A["Agent: organize material"]
    A --> B["Agent: review results"]
    B --> H["Human Gate: confirmation"]
    H --> O["Output: deliver results"]
Route work between steps
| Task requirement | How Agentflow arranges it |
|---|---|
| Follow a fixed sequence | Direct passes results to the next step |
| Select a path by condition | If / Else If checks conditions in order and sends the message only to the first matching branch; Else runs when none match |
| Run independent tasks together | Fan Out distributes work across branches; a Concurrent block calls its members in parallel |
| Wait for branch results | Fan-in Barrier waits for all sources in the same group before continuing |
| Request confirmation or more information | Human Gate pauses the workflow for a human response |
Agents interpret content, generate text, and call tools. Agentflow defines the connections and branching rules between steps, making it possible to inspect whether required reviews and confirmations are included.
Example 1: Coding, review, and commit
Coding tasks often follow a defined sequence: implement, review, revise if needed, then commit after confirmation. Agentflow lets different agents work in the same Project workspace while a person decides whether to proceed.
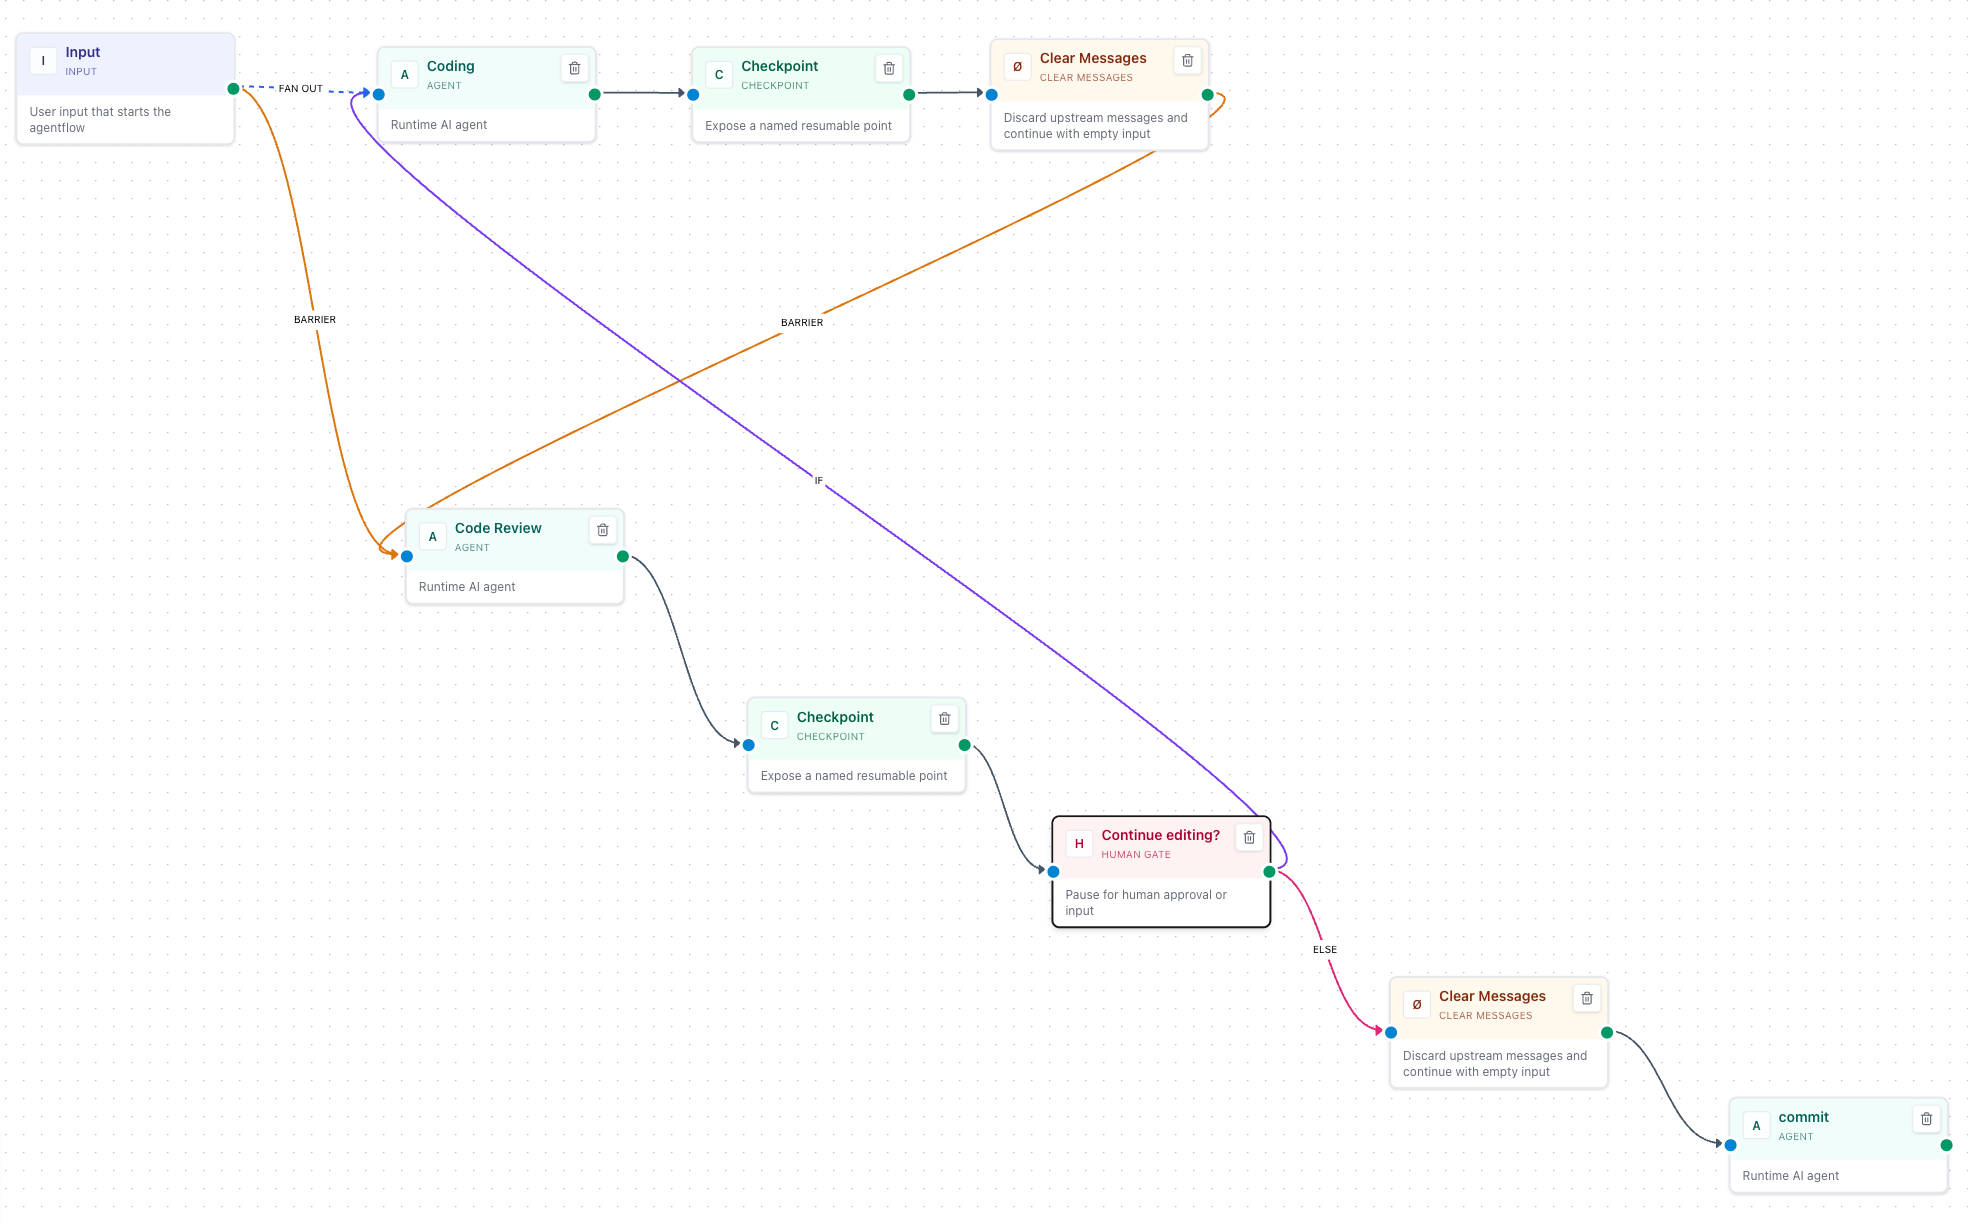
The workflow assigns these responsibilities:
- Coding uses Codex to implement changes in the current workspace.
- Checkpoint and Clear Messages mark a recovery boundary and discard upstream messages passed downstream, allowing the reviewer to inspect the workspace diff under its own instructions.
- Code Review uses Claude Code to review changes and report issues, followed by another Checkpoint.
- Human Gate asks a person whether further changes are needed. Revisions return to Coding; completed work proceeds to the Commit Agent.
- Commit Agent creates a Git commit according to the confirmed requirements.
Configure Codex, Claude Code, and Git in the execution environment, and confirm that each node accesses the same Project workspace. Give implementation, review, and commit nodes distinct instructions. Verify the complete path with a small change, then test the revision path.
Express revisions through human feedback and If / Else If conditions. Set the Human Step Mode to Input so a person replies in Response: for example, “revise” returns to Coding and “done” proceeds to the commit. Approval mode offers only Reject and Approve and collects no text, so conditions cannot read human feedback. Interrupt in Input mode and Reject in Approval mode both stop the workflow; neither takes the revision branch. The loop must have an explicit exit path.
Agentflow fixes responsibilities, order, and human decision points. You still need to check tests, resolved review findings, and the final diff. See the Agentflow guide for checkpoint recovery conditions.
Example 2: Extract locations from Xiaohongshu notes
A travel planning application can split “import a note and show its places on a map” into three data processing steps. Agentflow connects those steps and returns location data to the business system; the frontend handles the map display.
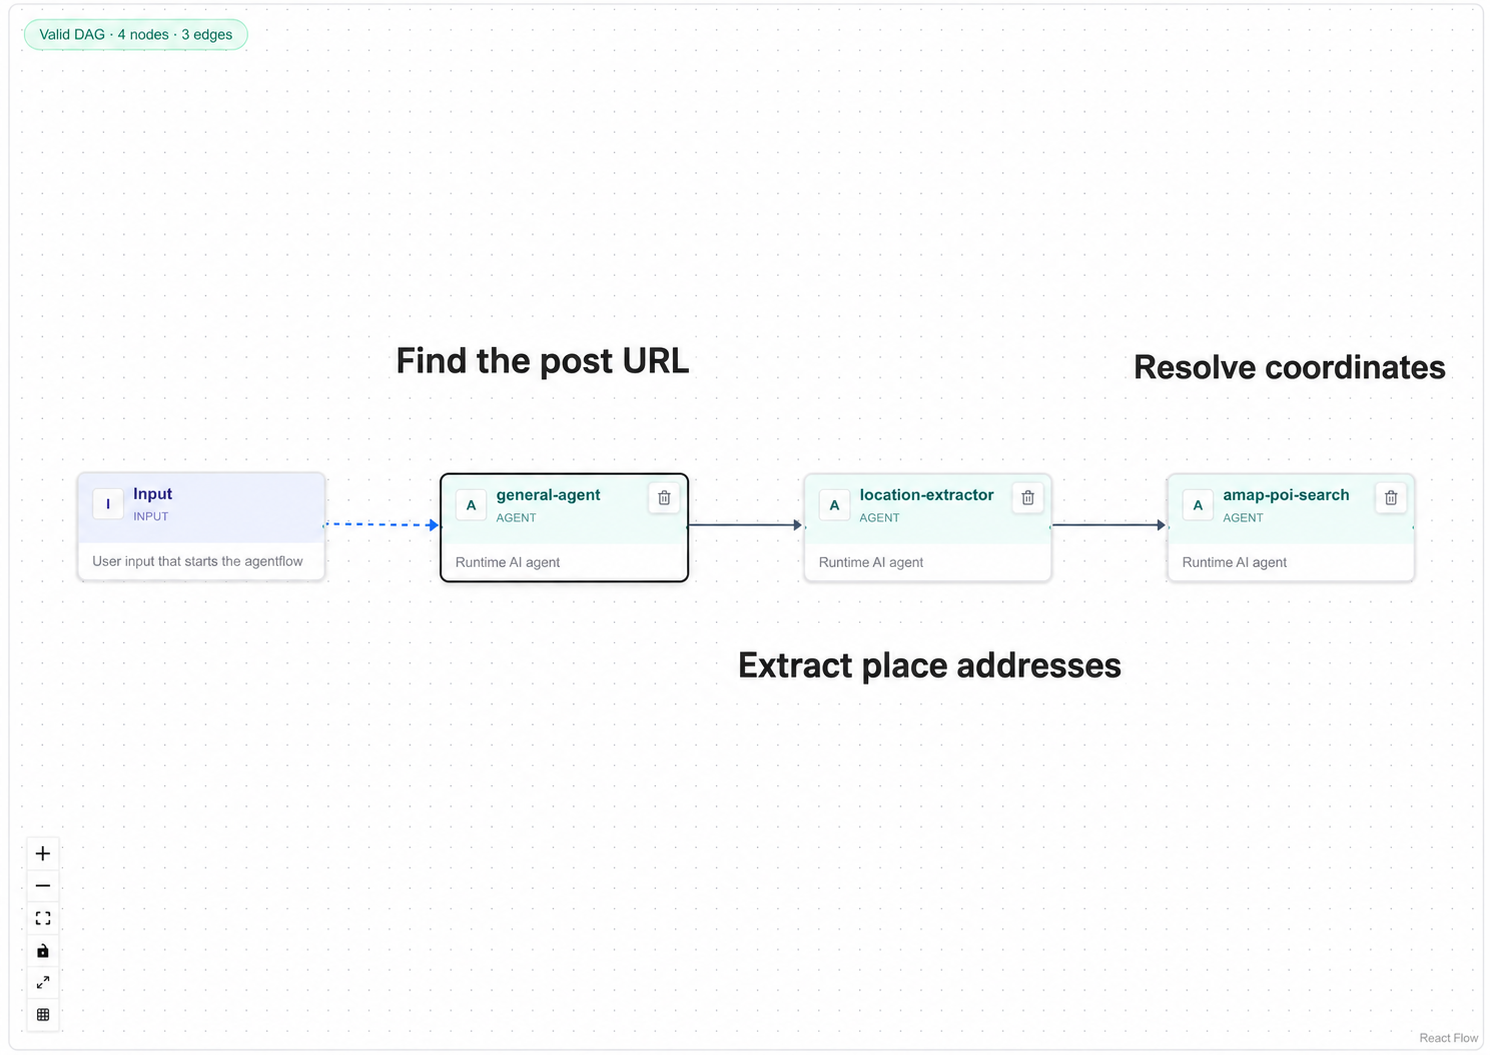
| Step | Processing | Result passed onward |
|---|---|---|
| Retrieve note details | An agent uses xhs-explore from xiaohongshu-skills to read a Xiaohongshu URL | Note content |
| Extract candidate places | The model interprets the content and extracts place names and addresses | Candidate places and addresses |
| Match locations | An agent calls the Amap MCP service to search for POIs (points of interest, such as attractions or restaurants) | Places and coordinates for the business system |
Prepare and configure the example’s Skill, Amap MCP service, and required accounts or credentials. Verify that the execution nodes can call them. These are dependencies of the example; creating an Agentflow alone does not provide those service capabilities.
Start with a note containing clearly identified places. Check that the content was retrieved, the extracted places came from the note, and each POI matches the correct city and address. Duplicate place names, incomplete addresses, and missing search results require more information or human review before treating candidate coordinates as confirmed locations.
Tools retrieve notes and query locations, the model interprets text and extracts places, and Agentflow passes results between steps in order. The business UI remains responsible for displaying the map.
Get started
- Prepare and individually verify the agents you need, such as an organizer and a documentation reviewer.
- Open the Agentflows editor and connect Input, two Agent nodes, Human Gate, and Output.
- Define each Agent node’s task. Set the Human Gate’s Human Step Mode to Approval and write the confirmation prompt.
- Save, select the Agentflow in Chat, and submit a short passage. Chat shows the input each node receives in the current turn as it runs; use it to check execution order, human confirmation, and the final output.
- Add conditional branches or parallel work after the basic path succeeds, then verify each path.
The workflow rules are predefined
Predefined steps do not mean the model returns identical answers on every run. Agents still assess their inputs, and conditional branches select paths from runtime results. Choosing Reject or Interrupt at a Human Gate stops the workflow.
Agentflow also supports dynamic collaboration through blocks such as Handoff and Magentic. Use explicit sequential edges when every step must execute; choose dynamic orchestration when the task calls for handoffs or planning.
3 - Shared context across agents
Last updated:
Let agents build on each other’s work
Use different agents to analyze requirements, write code, and review results. When you switch targets within the same conversation in a Project, AGW supplies the receiving agent with new public text from the other targets, reducing the need to copy background information and progress updates.
For example, let Coding make a change, switch to Review to assess it using the discussion so far, then switch back to Coding to address the feedback.
flowchart LR
    A["Coding: make changes and explain results"] --> B["Public text in the same conversation"]
    B --> C["Review: assess with context"]
    C --> D["Back to Coding: address feedback"]
Get started
- Prepare two working agents, such as Coding and Review.
- Select a Project in Chat and start a conversation with Coding.
- Wait for the current turn to finish, switch to Review in the same conversation, and explain the next task.
- Check that its reply follows the discussion; repeat important constraints in your new message if needed.
State the next task
After switching, try: “Review the changes described above for omissions and list only issues that need correction.” The receiving agent gets reusable public text, but still needs a clear request for its next step.
Briefly repeat important paths, acceptance criteria, and conclusions. To retain project conventions across conversations, use Project Memory.
What carries over
Handoff carries public conversation text, not private reasoning, tool-call protocols, or an external tool’s entire internal state. Unfinished messages from interrupted or failed turns are not handed off either. It is limited to 32,000 characters, so older content may be left out. Files must still be accessible in the receiving agent’s environment. A new conversation does not automatically inherit another conversation’s discussion.
Read the Chat guide · Configure external agents for different purposes
4 - Image input
Last updated:
Add visual context
Attach images when asking about a UI problem, design, or chart. For example, send an error screenshot with the steps that led to it, or ask a vision-capable model to inspect a page layout.
Ask a specific question
For example: “The Save button is obscured in this screenshot. Identify possible layout problems and tell me what else you need to know.” When comparing images, label the expected design and the current page so the agent can focus on the difference.
To change code, also provide the Project and file access. A screenshot supplies visual information alone.
Get started
- Choose a model and execution target that support image understanding.
- Add images in Chat: paste them into the message box in Web and Desktop, or choose them from the photo library on Mobile. Then explain what the agent should focus on.
- Check the attachments, send the message, and verify that the reply interprets the image correctly.
| Item | Supported range |
|---|---|
| Formats | JPEG, PNG, GIF, WebP |
| Images per message | Up to 5 |
| Size per image | Up to 5 MB |
| Total attachments | Up to 10 MB per message |
flowchart LR
    A["Images + question"] --> B["Chat message"]
    B --> C["Image-capable model / external runtime"]
    C --> D["Reply using the image"]
Image understanding depends on the selected model and external runtime. Adding an attachment does not mean every model can interpret it. If screenshot text is small or unclear, include the key text and a specific question in your message.
5 - Memory: preferences and project knowledge
Last updated:
Keep information worth reusing
A conversation may end while working preferences and project knowledge remain useful. AGW provides two kinds of Memory for later work.
| Memory | Good for | Scope |
|---|---|---|
| User Memory | Personal preferences, writing conventions, lasting background | The current user, across Projects |
| Project Memory | Project conventions, decisions, working notes | The project’s working context |
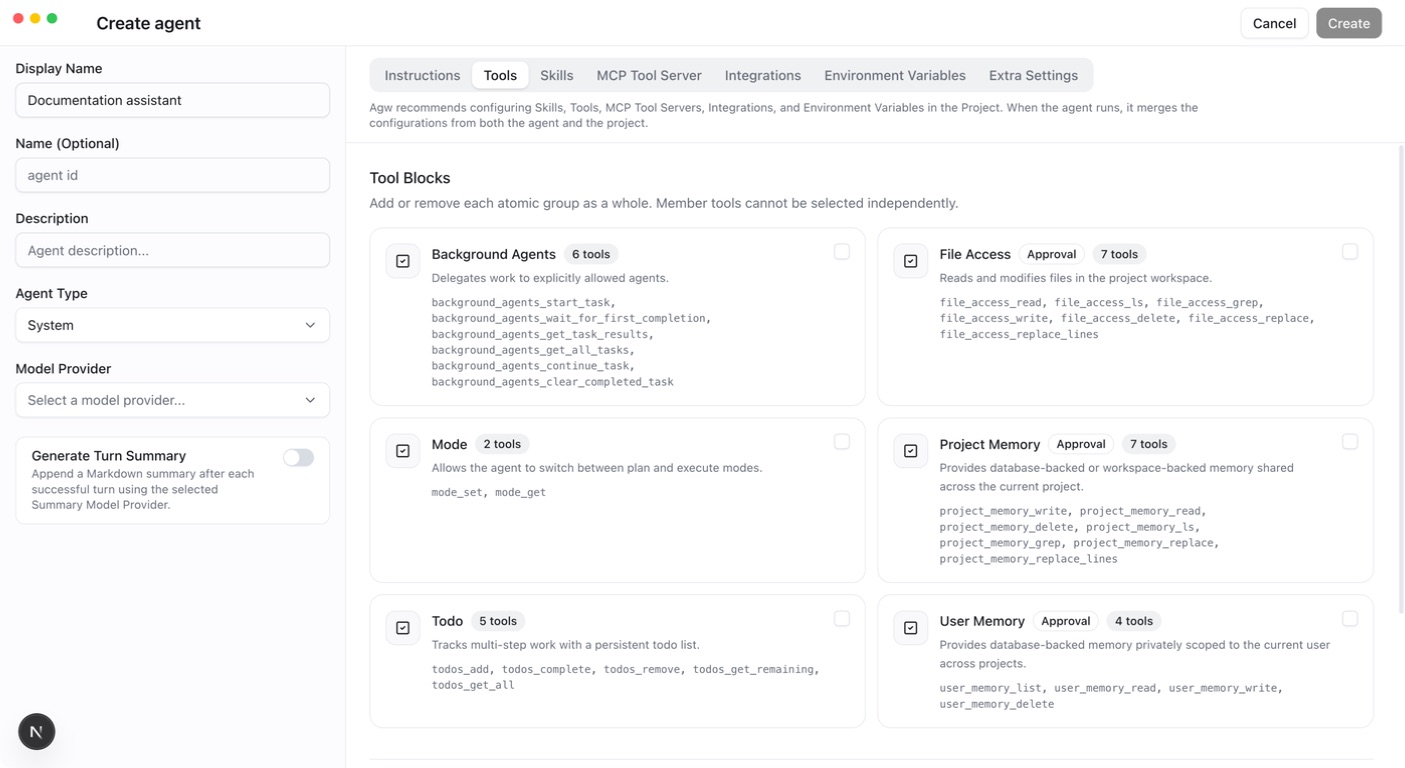
Configure the appropriate Memory capability on an Agent or Project, then ask the agent to save information and check or update it in later conversations. Memory needs deliberate maintenance; it does not automatically retain and inject every chat message forever. User Memory is isolated by user. Project Memory scope also depends on the project and storage choice; filesystem memory is shared when workspaces are shared. External agents (Claude Code, Codex, Pi) only receive existing User Memory entries (up to 50) as read-only context. They get no memory tools, so they cannot save or update memory, and Project Memory configured on the Agent or Project does not apply to them.
Two storage modes for Project Memory
Project Memory offers Database and Project Workspace (Primary directory: .agw/memory) storage; Project Workspace is the default. Both expose the same tools for saving, finding, reading, and updating project knowledge. They differ in where content lives, how it is shared, and how you back it up.
| Comparison | Database | Project Workspace (filesystem, default) |
|---|---|---|
| Location | The database used by AGW | .agw/memory/ under the primary workspace |
| Scope | Project ID | The actual workspace directory |
| Agents / conversations in one Project | Share memory when using Database mode | Share memory when using the same workspace and filesystem mode |
| Two Projects with one workspace | Keep separate database memories | Read and write the same memory directory |
| Backup | Part of the AGW database backup | Part of the project files, including the hidden .agw/memory/ directory |
| Useful for | Central management without memory files in the workspace | Direct file inspection or moving memory with the workspace |
Database: managed centrally by AGW
With Database, memory content is stored in AGW’s configured database. Content is still organized by file name, but no corresponding memory files are created in the workspace. Agents read these records through Project Memory tools.
Memory is scoped by Project ID. Agents using Database mode in the same Project can reuse it. Another Project pointing to the same workspace retains its own database memory. Changing the primary workspace does not change which Project owns the database memory.
This mode suits deployments that manage and back up data centrally. Follow AGW’s backup procedure to retain the database and required encryption keys; copying the code directory alone does not include database memory. In a multi-node deployment, the shared database lets execution nodes access the same project memory, subject to project access checks.
Project Workspace: files in the project directory
With Project Workspace (Primary directory: .agw/memory), memory lives in the primary workspace on the execution host. For example, a Workspace of /work/demo produces this memory directory:
Here, coding-conventions.md is the content, coding-conventions_description.md is the optional description supplied when saving, and memories.md is the index maintained by AGW. This directory stays under the primary workspace; selecting an additional directory in Files does not change it.
This mode makes files easy to inspect. You can decide whether to include them in Git or project backups; AGW does not commit them automatically. Make sure backups and transfers include the hidden directory. Writes and deletions through memory tools maintain the index. Direct file edits may leave it out of date, so prefer memory tools for routine maintenance.
Two Projects pointing to the same actual workspace share its .agw/memory/, even with different Project IDs. Changing Workspace makes the agent use memory at the new location; existing files are not moved automatically. Persist the workspace with a mount in Docker. Across execution nodes, the directory contents must be shared; identical path strings alone are not enough.
flowchart TD
    A["Project Memory tools"] --> B{"Storage"}
    B -->|"Database"| C["AGW database: scoped by Project ID"]
    B -->|"Project Workspace"| D["Primary workspace/.agw/memory"]
Configure and verify
Prerequisites: a working custom Agent and Project. Filesystem mode also requires the execution host to be able to read and write the primary workspace.
- Open Tools on the Agent or Project and select the Project Memory ToolBlock.
- In the expanded card’s Storage selector, choose Database or Project Workspace (Primary directory: .agw/memory) and save. Prefer configuring it on the Project when you want a consistent project-wide choice.
- In a new turn in that Project, ask the agent to save a concrete convention, such as: “Save our project convention to use UTC in
time-conventions.md, with a short description.” Writes remain subject to mode and approval settings. - Open a new conversation in the same Project with an agent that has the memory capability and matching storage mode. Ask it to list and read the entry. It should retrieve the saved content.
- In filesystem mode, you can also inspect the files in
.agw/memory/. Database mode creates no files there; verify through memory tools instead.
The modes are separate data sources. Changing Storage does not automatically copy, merge, or delete memory in the other mode. To migrate, back up the source, read the content and descriptions you want to keep, switch modes, and write them through memory tools before verifying the results. Test configuration changes in a new turn; active turns retain their starting configuration.
How agents use saved memory
Project Memory supplies an index to the model, and the agent reads relevant content as needed. The generated index currently contains up to 50 entries; additional memories remain discoverable through list and search tools. Full memory contents are not sent with every request.
Keep each entry focused on one topic, with a clear filename and short description. Update existing entries when conventions change and remove obsolete information to avoid contradictory guidance. User Memory is always stored in the database and isolated by user; this Storage setting does not affect it.
Implementation and references
6 - Plan and Execute modes
Last updated:
Plan before taking action
Before changing code or starting a complex task, ask an agent to assess the situation and propose an approach. Configure the Mode ToolBlock on a custom agent or a Project to give custom agents Plan and Execute modes; on a Project, every custom agent running in that Project receives it.
| Mode | Useful for | Tool behavior |
|---|---|---|
| Plan | Inspecting the situation, analyzing problems, proposing an approach | Only tools explicitly allowed in Plan are available |
| Execute | Carrying out an agreed approach | Configured tools remain subject to permissions and approval rules |
Example: revising documentation
In Plan, ask: “Read the documentation and identify unclear terms and missing examples. Propose changes first.” Review the scope, then switch to Execute and ask the agent to apply the agreed changes. Inspect the diff to confirm that facts and limits were preserved.
Reading and editing still require the configured tools. Switching modes does not add missing file capabilities.
Get started
- Configure the Mode ToolBlock and required tools in the Tools tab of a custom agent or Project.
- New turns start in Execute. In the Chat input, click + and choose Plan mode. When the Plan chip appears in the input, ask the agent to analyze the problem.
- The proposal appears as a Plan card that you can copy. After agreeing on the approach, click × on the Plan chip to return to Execute. Respond in the UI when the agent requests a mode change.
- Review the changes and results; return to Plan for further discussion if needed.
flowchart LR
    A["Plan: analysis and proposal"] --> B["User confirms mode change"]
    B --> C["Execute: do the work"]
    C --> D["Review results"]
    D --> A
Plan restrictions depend on tool declarations and execution checks, not a prompt alone. Execute does not automatically approve every operation: working mode determines which tools can run, while approval settings determine whether a call needs confirmation. External agents have their own supported modes and permissions, which may differ from custom agents.
7 - Structured responses with JSON Schema
Last updated:
Make replies readable by programs
Agents return Markdown text by default, which reads well but is awkward to parse. Configure a Response Schema on an agent and its final reply becomes a JSON object matching the JSON Schema you supply, so Jobs, Agentflows, and API callers can read named fields directly.
For example, a documentation reviewer can return an issues array whose entries contain original, problem, and suggestion. A scheduled run can then file each entry as a ticket instead of searching through prose.
What you configure
Response Schema is a tab in the agent create and edit dialog. Its content is a JSON Schema object:
Validation on save:
| Input | Result |
|---|---|
| Empty | Structured output is off; replies stay plain text |
| A valid JSON object | Saved and applied on the next turn |
| Invalid JSON, an array, or a scalar | Inline error; the save button stays disabled |
JSON Schema draft-07 is recommended. Anthropic models require type set to object, properties as an object, and required as an array; use "required": [] when every field is optional. A custom agent using an Anthropic Provider fails before sending the model request when any of these is missing.
Supported targets
| Execution target | How the schema is passed |
|---|---|
| Custom agent (System) | Response format of the model request |
| Claude Code | The CLI’s --json-schema argument |
| Codex | The turn’s output schema |
| Pi | Not supported |
AGW passes the schema to the model or CLI, which generates the result; AGW itself does not validate each field against the schema. For a custom agent with Generate Turn Summary enabled, AGW requires exactly one valid JSON object or array in the turn’s last complete reply; otherwise the turn fails and keeps its execution record. When a Result marked as JSON cannot be parsed, Chat shows “Invalid structured result: expected one JSON object or array.”
Get started
- Open Agents, edit an agent, and switch to Response Schema.
- Paste a JSON Schema object, confirm no validation error appears, and save.
- Run a small task in Chat and check that the final result is the JSON you expect.
- Once the structure is stable, use that agent in a Job or an Agentflow step.
flowchart LR
    A["Agent with a Response Schema"] --> B["Turn runs"]
    B --> C["Model or CLI produces a conforming result"]
    C --> D["Chat shows the Result as JSON"]
    C --> E["Jobs, Agentflows, and APIs read the fields"]
When a custom agent also has “Generate Turn Summary” enabled, AGW extracts that JSON from the turn’s last complete reply as the turn’s Result and does not call the Summary Model Provider. Chat shows this Result as literal JSON without Markdown rendering. Without that switch, the model still returns JSON text that follows the schema, but it is an ordinary reply rendered as Markdown and produces no Result, so Only Stream Turn Result in Conversation Settings has no effect on it. Claude Code and Codex produce a Result on every turn. The selected Summary Model Provider is preserved and applies again once the schema is cleared.
A schema describes the result structure only. It is never executed as code, and remote $ref targets are not fetched. Whether fields are filled correctly still depends on the selected model and the instructions, so review the content even when the JSON is well-formed.
8 - Tool approval
Last updated:
Confirm before an operation
When an agent calls a tool, AGW can ask for confirmation according to your permission settings. Inspect the tool name and arguments before deciding whether it should proceed, particularly for file changes or command execution.
| Permission mode | Ordinary write and execution tools |
|---|---|
| Always ask | Ask for confirmation on every call |
| Allow same arguments | After approval, reuse a matching argument grant within the current session |
| Full access | Automatically approve ordinary tool calls |
Ordinary read-only tools generally need no execution approval. Approval requirements come from the tool’s declared permission, not whether its name or command looks harmless.
Choose a permission mode
Use Always ask to inspect the arguments when first trying a write tool. For repeated operations in one session, Allow same arguments reuses approval only when the arguments match; changed arguments do not reuse that grant.
Before choosing Full access, check the agent’s tools and workspace. It reduces ordinary approval prompts, but results still need review.
Get started
- Select an agent that supports approval and choose a suitable permission mode in Chat.
- Start a task. When an approval request appears, inspect the tool, arguments, and target paths.
- Approve to continue, or reject the call and explain what you want changed.
- Check the tool result against your expectations.
flowchart TD
    A["Agent requests a tool call"] --> B["Check mode and permissions"]
    B --> C["Human confirmation required"]
    C --> D["Approve: run the call"]
    C --> E["Reject: return the decision to the agent"]
Full access does not bypass Plan restrictions or answer user-input requests and workflow HumanGates for you. Claude Code supports a native tool-approval bridge. The current Codex and Pi integrations support Full access only. The permission menu always lists all three modes; modes the target does not support are disabled, with the reason shown below them.
With Only Stream Turn Result turned on in Conversation Settings, external agents and custom agents with Generate Turn Summary enabled automatically decline tool approvals and questions that need a person, and the UI does not show those requests. Full access and automatic approvals from existing grants still apply. Turn the switch off when you need to approve calls one by one.
Check external agent permissions · Learn about workflow approvals
9 - File browsing and Git change review
Last updated:
Review agent changes next to the conversation
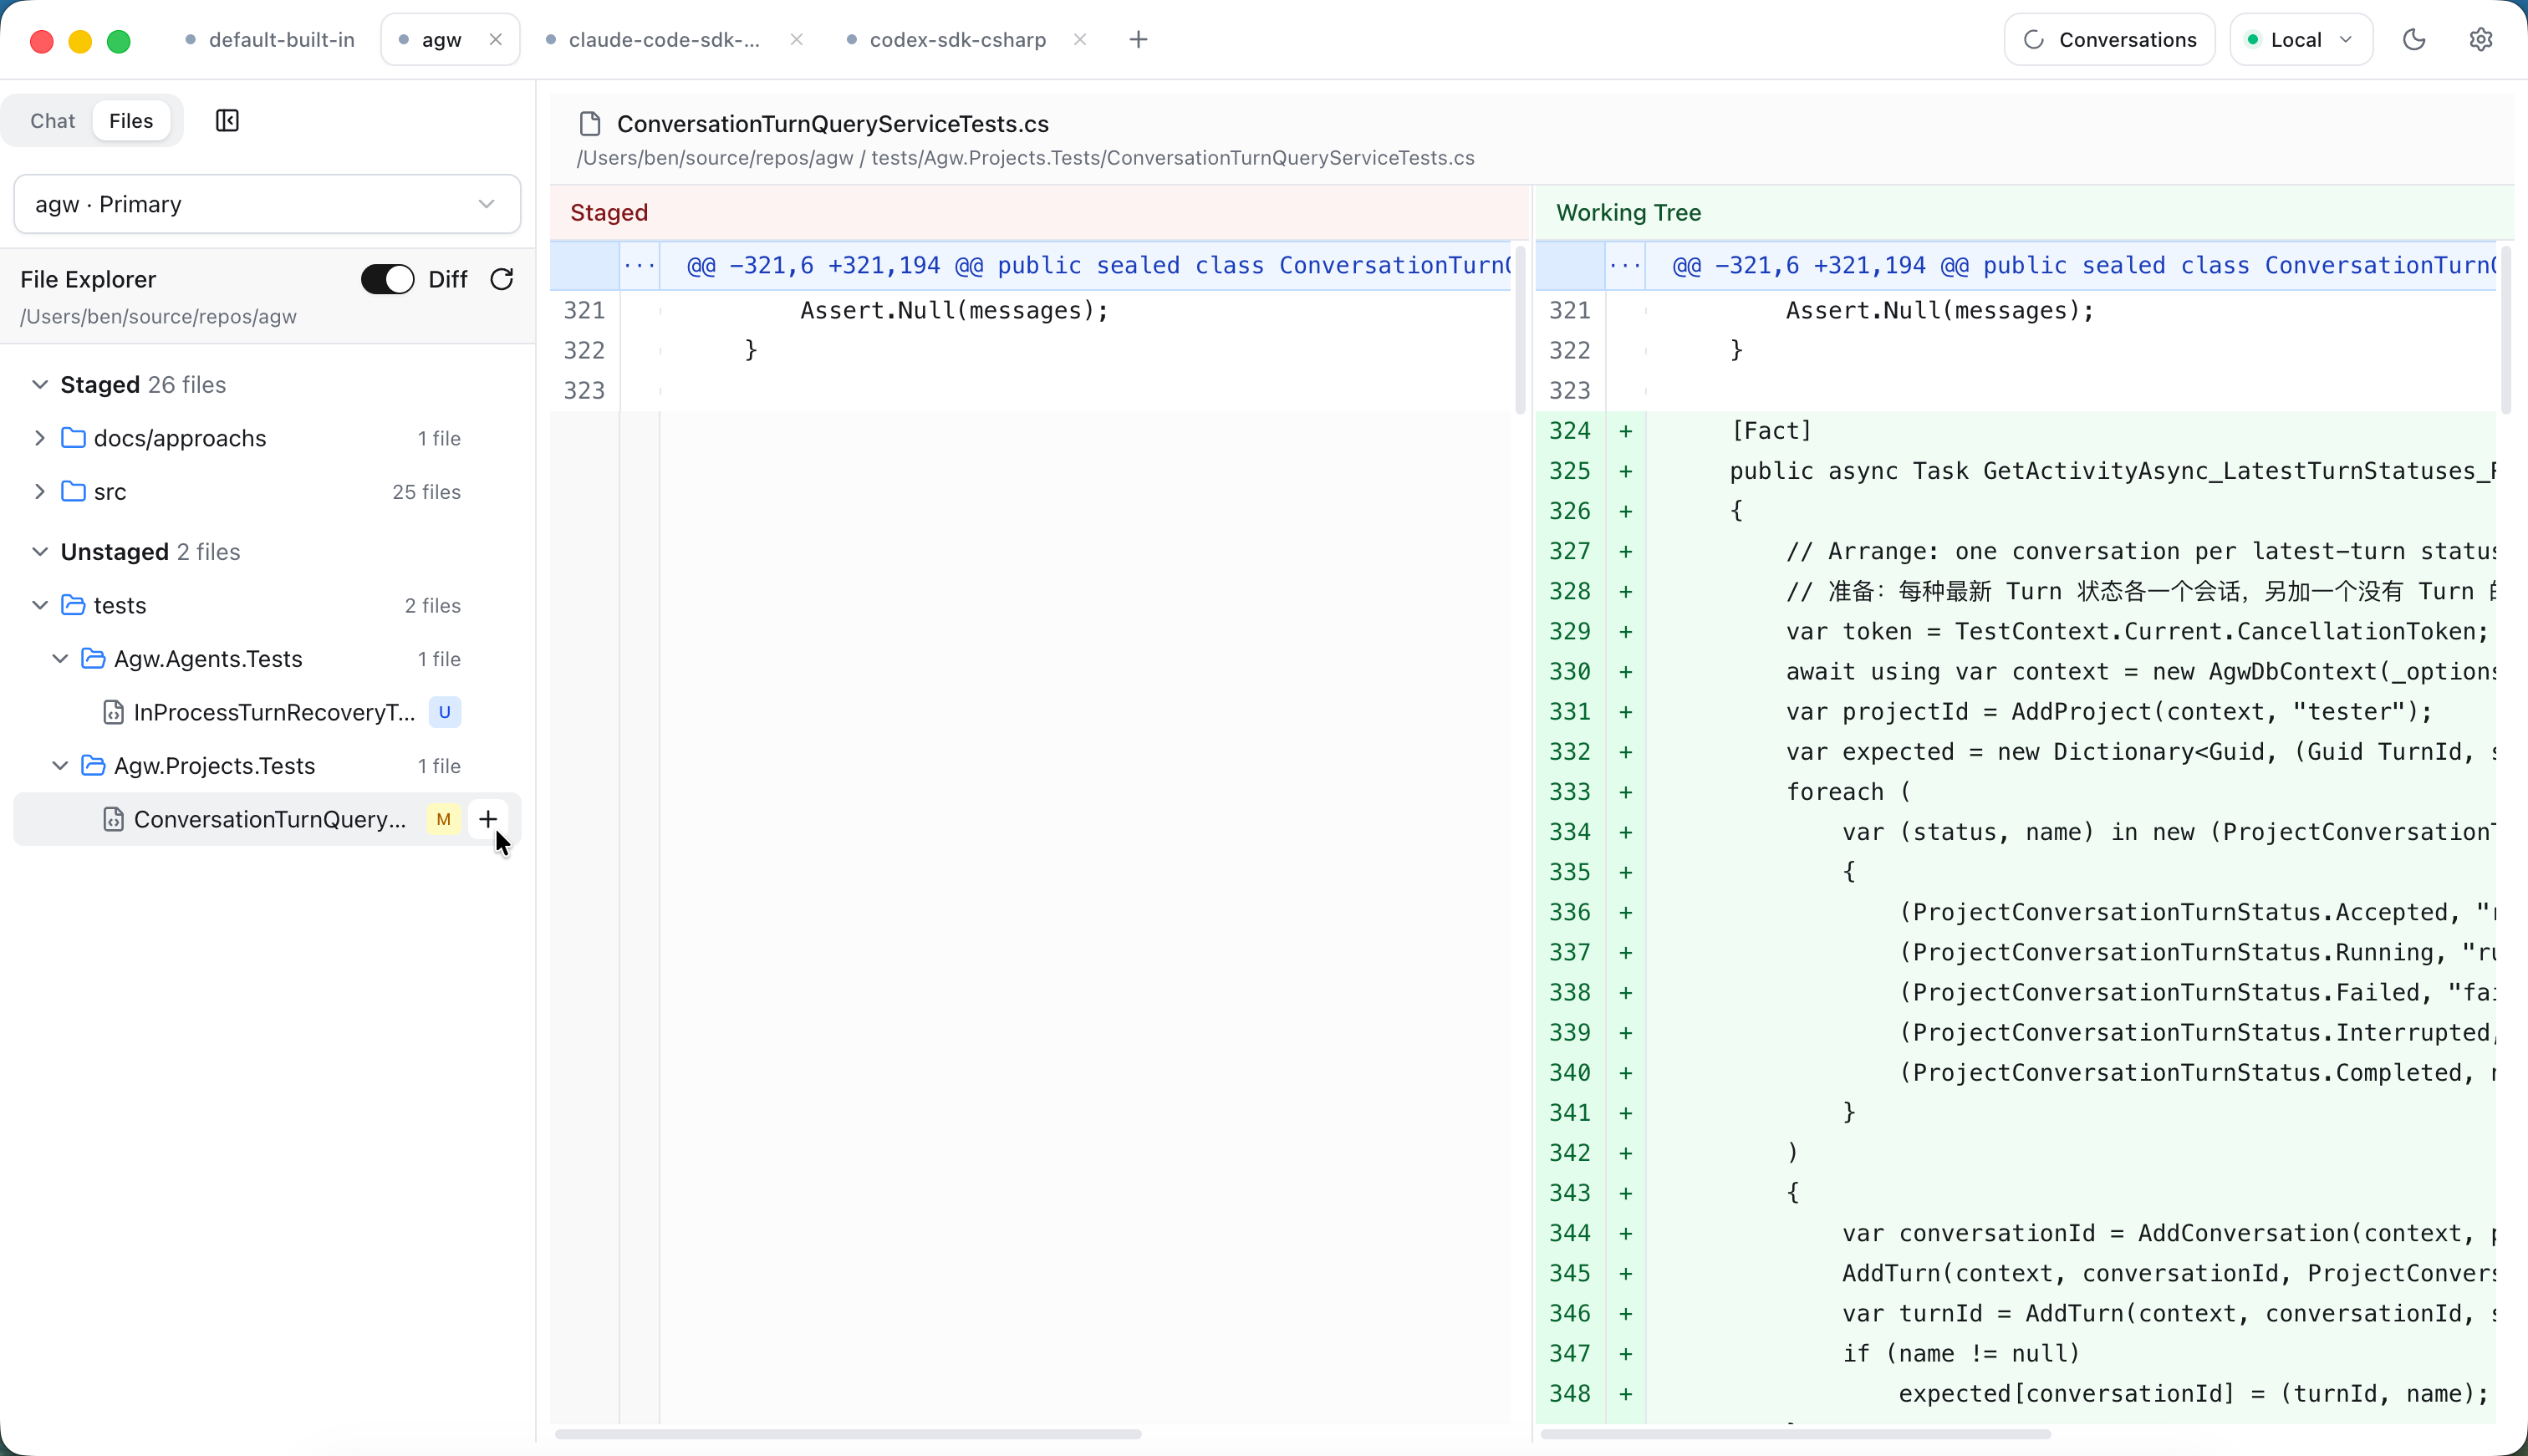
After an agent edits code, you need to see which files changed and whether each edit is what you expected. Switch to Files in the Chat workspace to browse the Project workspace, inspect Git changes, and turn the spots that need work into line comments for the agent, all without opening a separate editor or terminal.
Inspect changes
Turn on the Diff switch at the top of the file tree to show only files with Git changes, grouped into Staged and Unstaged. A file with both staged and unstaged edits appears once in each group. The letter next to a file name shows the change type: A added, M modified, D deleted, U untracked.
Select a file to see its old and new content side by side. The Staged group compares HEAD → Staged; the Unstaged group compares Staged → Working Tree. Turn off Diff to browse the full directory tree and view each file’s current content.
| Action | Where | Effect |
|---|---|---|
| Stage / Unstage | In Diff mode, hover over a file or directory and click + or - | Stage or unstage that file, or every change under that directory |
| Reset to HEAD | A file’s context menu | Restore both the index and working copy of that file to HEAD |
| Delete | A file or directory’s context menu, after confirmation | Delete the file, or delete the directory recursively |
Reset to HEAD and Delete change files on disk and cannot be undone from the UI. Make sure nothing you need will be lost before running them.
Send line comments to the agent
In file content or a diff, hover over a line and click the + button that appears to the right of its line number to write a comment. Press Ctrl/Shift+Enter to submit or Esc to cancel. A line that already has a comment hides the button; double-click the comment to edit it, or click its delete button to remove it. In a diff, you can comment on the old side and the new side separately.
Comments wait above the Chat input, which shows how many are pending, such as “2 code comments”. Switch back to Chat, describe what you want, and send the message. Each comment’s file path, line number, side (old or new), and group travel with that message to the agent. Once the Server accepts the execution, the sent comments leave the pending list. Click × next to the count to discard all pending comments.
For example, after an agent finishes a refactor, open Diff and check the Unstaged group. Comment “Read the retry count from configuration” on the new retry logic and “This branch is missing an error log” on another line, then send “Apply the comments and explain each change.” Stage files that pass review. When the agent edits them again, the new edits appear in the Unstaged group, which keeps reviewed and unreviewed changes apart.
flowchart LR
    A["Agent edits files"] --> B["Files: review in Diff"]
    B --> C["Comment on lines to change"]
    C --> D["Chat: send comments with a message"]
    D --> A
    B --> E["Files that pass review: Stage"]
Get started
- Choose a Project whose workspace is inside a Git repository. You can browse files in a directory outside Git, but change views and Git actions are unavailable there.
- Click Files in the Chat workspace. If the Project has additional directories, choose the one to browse from the dropdown above the file tree.
- Turn on Diff, select a file in the Staged or Unstaged group, and review the changes.
- Comment on lines that need work, switch back to Chat to send a message, then return to Files to review the agent’s new edits.
Scope
- The file tree, diffs, and Git actions apply only to the selected directory. Changing the browsing directory does not change the agent’s default working directory; the agent still starts in the primary workspace.
- Files does not create commits or switch branches. Ask the agent to do that, or use a terminal.
- Pending comments exist only in the current page. Switching Projects or reloading the page clears them.
- Mobile can browse files, view diffs, and reset or delete files. Staging, unstaging, and sending line comments to the agent are available in Web and Desktop.
10 - Multiple clients
Last updated:
Continue on the device that fits
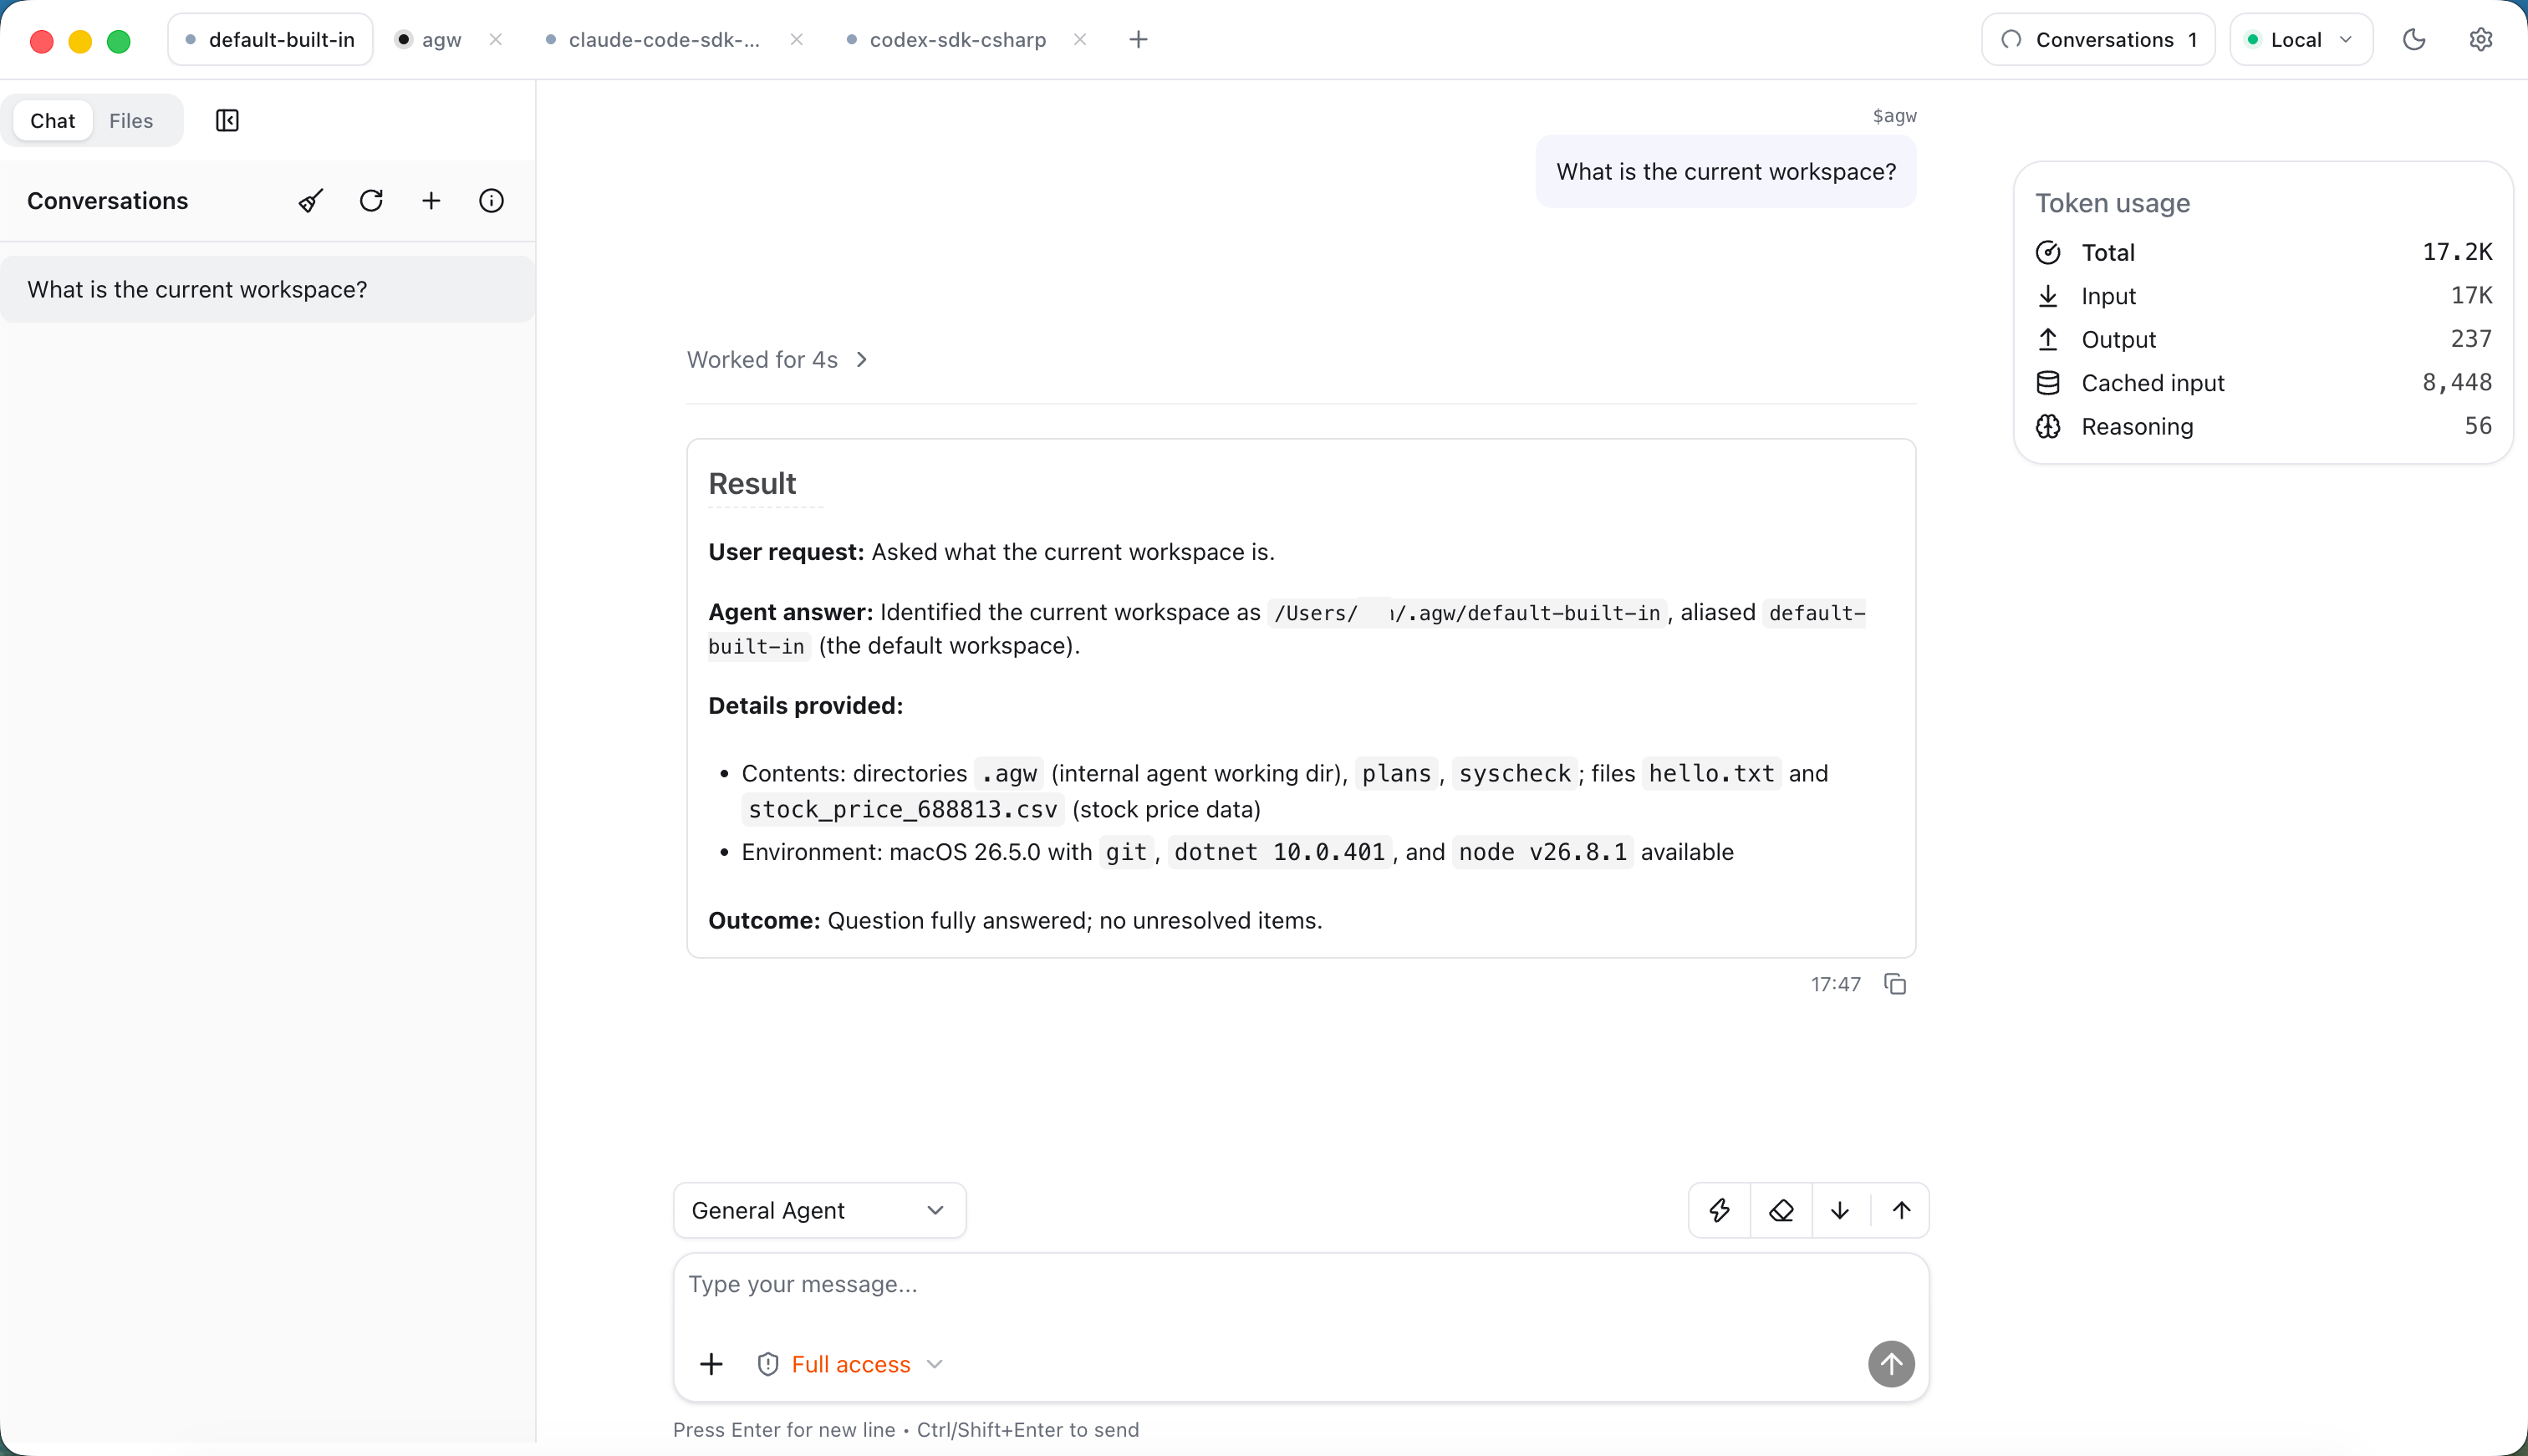
AGW provides Web, Desktop, and Mobile clients. Connect to the same Server with the appropriate identity to access your authorized projects and saved conversation history, choosing the device that suits the task.
| Client | Useful for |
|---|---|
| Web | Management and chat in a browser without a desktop installation |
| Desktop | A daily workspace, multiple Server profiles, local or remote use |
| Mobile | Checking conversations, accessing projects, and continuing discussions on the go |
The same Server versus a different Server
To continue on another device, connect to the same Server and select the same Project and conversation. Saved history is available there; recent output may need time to persist or a state check after reconnecting.
Different Servers keep separate configuration and records. If a Project disappears after switching Servers, check the address and identity before recreating it.
Get started
- Initialize the Server and make sure the device can reach its address.
- Sign in to Web with the administrator password or a third-party account. Connect Desktop with an API Key, or, when the Server has identity providers, click Sign in with … to sign in with a third-party account and receive a Server-issued API Key. On Mobile, enter an API Key, or use Import Web configuration to paste the configuration copied with Copy config in Web Settings.
- Confirm the Server and Project, then open an existing conversation or create one.
- Check history and execution status to avoid starting the same task again after switching devices. The icons in the conversation list show Running, Last turn failed, or Last turn interrupted.
Tasks run on the execution host. Connecting from a phone or browser does not move execution to that device. Desktop Full includes a Server; Desktop Client connects to an existing one. Mobile currently offers a source-based setup. Layouts and management entry points vary across clients.
Read the client connection guide · Install and configure Server
11 - Third-party account sign-in
Last updated:
Use an existing account to reach your own workspace
Once an operator enables identity providers on Server, the sign-in page shows “Continue with …” buttons. Authenticate with an organization account such as Keycloak, Microsoft Entra ID, or Google, or with an OAuth2 service such as GitHub, and you reach AGW without a shared administrator password.
The first sign-in with an account creates an isolated local user and prepares its default Project. From then on, its agents, projects, conversations, integration connections, and API Keys belong to that user and stay invisible to others. The administrator account is unchanged.
Sign-in methods
| Method | Client | Resulting credential |
|---|---|---|
| Third-party account | Web | Browser session Cookie |
| Third-party account | Desktop | API Key issued by Server |
| Administrator password | Web | Browser session Cookie |
| API Key | Desktop, Mobile, automation | Manually configured API Key |
With no provider configured, the administrator password and API Keys remain available. Mobile connects with an API Key.
Get started
- Ask the operator to enable a provider on Server and register AGW’s callback URL at that provider.
- Web: open the Server URL, choose the account button on the sign-in page, and return to the page you requested.
- Desktop: choose “Sign in with …” in the Server profile, complete authentication in the system browser, and return to the Desktop window.
- Check that the Project list holds that account’s data. The Desktop Server profile then offers a “Sign out” button.
flowchart LR
    A["Choose an account on the sign-in page"] --> B["Identity provider authenticates"]
    B --> C["Server validates and resolves the local user"]
    C --> D["Web: session Cookie"]
    C --> E["Desktop: one-time code exchanged for an API Key"]
Desktop authenticates in the system browser. Server hands a one-time code back through agw-desktop://auth/complete, and Desktop exchanges it, together with its own verifier, for an API Key. The code is valid for two minutes and can be used once; the API Key is kept in the system credential store. Signing out in Desktop revokes that API Key.
Scope and limits
The same person signing in through two providers becomes two separate users: identity comes from the provider’s issuer and account identifier, never from a matching email address. There are no roles, administrator elevation, or per-key permission scopes; a third-party account receives ordinary user access.
Disabling a provider blocks new sign-ins and pending Desktop exchanges. Cookies and API Keys already issued are handled separately. Remote deployments require HTTPS URLs.
Configure identity providers · Connect Web, Desktop, and Mobile