This is the multi-page printable view of this section. .
User guide
Last updated:
- 1: Model providers
- 2: Create a custom agent
- 3: Connect external agents
- 4: Chat and execution history
- 5: Projects, files, and workspaces
- 6: Agentflow
- 7: Scheduled jobs
- 8: Tools and Skills
- 9: MCP servers
- 10: Configure integrations
- 11: Web, Desktop, and Mobile
Each guide explains one part of AGW and can be read on its own. If you do not yet have a working agent, configure a model provider first.
- Conversations: start with model providers, agents, and Chat.
- Project material: set a workspace, then add tools and Skills.
- External capabilities: choose external agents, MCP, or integration accounts.
- Automation: verify the task, organize steps with an Agentflow, and set a schedule with a Job.
1 - Model providers
Last updated:
Before a custom agent can answer, AGW needs to know which model to use, where to send requests, and how to authenticate. Prepare the API endpoint, model ID, and API key supplied by your model service.
This page covers model configuration in AGW. To use an existing command-line setup, see External agents.
Three configuration objects
A Provider describes the endpoint and authentication. A Model describes a model and its limits. A Model Provider links the two for agent selection. Creating a Model alone does not establish a connection.
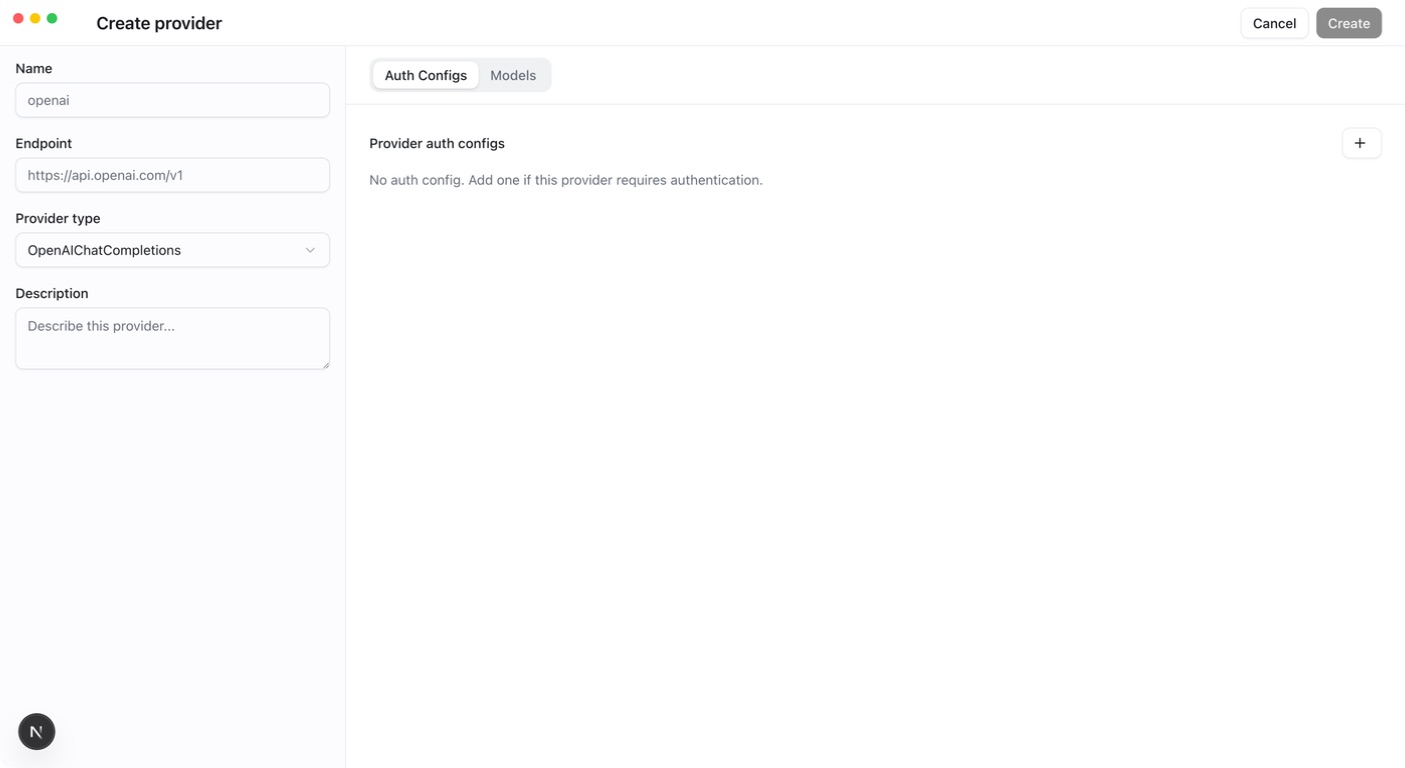
- In Providers, open Create provider, select the matching protocol, enter the endpoint, and add and enable a credential in Auth Configs.
- Switch to the Models tab and select the models this Provider serves. For OpenAI Chat Completions or OpenAI Responses with an enabled ApiKey in Auth Configs, click Fetch Models to load the service’s model list. For an Anthropic Provider, first create the models manually with Create model on the Models page, then return to the Provider and select them.
- Save the Provider. This links each selected model to the Provider as a Model Provider and creates any newly fetched models.
- On the Models page, use Edit model to verify each identifier and set Context window and Maximum output from the limits your service publishes.
- Select that link in an agent and test it with a short question.
Current protocols include OpenAI Chat Completions, OpenAI Responses, and Anthropic. Compatible services must match the actual protocol; “OpenAI” in a name is not sufficient.
Context limits
Each model has length limits. Configure these two values separately:
- Context window: the total content a single request can accommodate, including conversation history, the current question, tool results, and the model’s reply.
- Maximum output tokens: the maximum length of a single reply. Tokens are units used to measure content length; they are not the same as words or characters.
Both values must be positive integers, and maximum output must be smaller than the context window; the form shows their difference as the Effective input budget. Before each model call, a custom agent checks the content it will send against this budget: above 50%, result bodies of older tool calls are removed from the request; above 80%, older message groups are truncated. Both stages keep the 2 most recent message groups, and the conversation history stored in the database is unchanged. External agents manage their own context.
When discovering a model, AGW may fill in 256,000 for the context window and 64,000 for maximum output tokens as defaults. These values do not guarantee that the selected model supports those lengths. Use the limits published by your model service provider. Values that are too high can cause requests to be rejected. If short conversations work but longer ones fail, check these two settings first, then consult the Server logs for the specific error.
Success means an agent completes a conversation. Fix invalid credentials, endpoints, or unavailable models before adding tools. Keep real API keys out of shared prompts and Git files.
Implementation and references
2 - Create a custom agent
Last updated:
An agent is a reusable assistant configuration. Its model interprets requests, its instructions define the task, and its tools determine which operations it can perform. For example, create separate agents for explaining code and reviewing documentation, then select one in Chat.
Start with a working Model Provider. This page covers custom agents run by AGW; see External agents for Claude Code, Codex, and Pi.
Create an agent
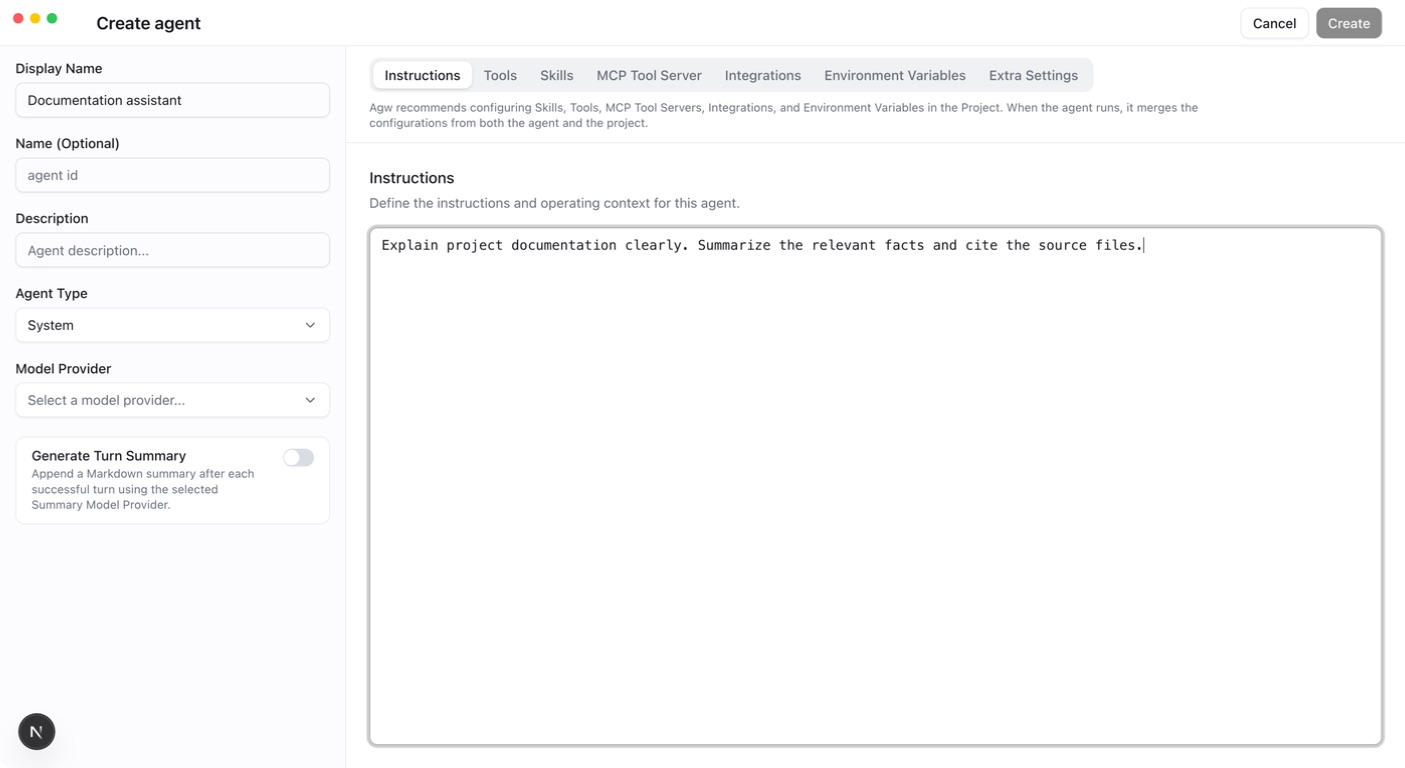
- Open Agents and click Create. Keep Agent Type set to
System(a custom agent) and enter a Display Name that describes its responsibility. - Select a Model Provider. In Instructions, describe the task, input, and expected output. Create stays disabled until the Display Name and Model Provider are set.
- Configure capabilities as needed in the Tools, Skills, MCP Tool Server, Integrations, and Environment Variables tabs. File capabilities require a correct Project workspace.
- Save, confirm the agent is enabled, and run a small task in Chat.
For example, start with a “Code explainer” that answers questions, then add read-only file capabilities after verifying the model. Instructions cannot grant tool access beyond execution permissions.
Give the agent a clear responsibility
Include the task scope and expected output in its instructions. For a documentation reviewer:
Test with a short pasted passage. To read project documents directly, add file-reading tools and run it in the correct Project. Instructions describe the task; actual tool configuration and permissions determine access.
Return replies as JSON
When a program reads the result, paste a JSON Schema object into the Response Schema tab of the create or edit dialog:
Saving requires valid JSON whose root is an object; an empty value turns structured output off. Anthropic models additionally require type set to object, properties as an object, and required as an array. The schema is passed to the model as the response format. When a custom agent also has “Generate Turn Summary” enabled, AGW requires exactly one JSON object or array in the last complete reply, or the turn fails; that JSON becomes the turn’s Result directly, without calling the Summary Model Provider.
Among external agents, Claude Code and Codex support this configuration. For Pi, the Response Schema tab is shown but disabled, and the Server rejects a schema. See Structured responses with JSON Schema for details.
Turn summaries
A custom agent can turn on Generate Turn Summary. After each successful turn, AGW uses the Summary Model Provider to append a Markdown summary as the turn’s Result; without a selection, it uses the agent’s own Model Provider. The summary input contains only this turn’s user text and the agent’s reply text, without history, tools, or Skills. External agents do not offer this switch.
With the switch on, the agent’s turns produce a Result, so Only Stream Turn Result in Conversation Settings also applies to it.
Edit and reuse
Definition changes take effect on the next turn while retaining the conversation identity. Active turns keep the configuration snapshot captured at their start, including permissions and directories.
Use Copy agent in the Agents list to copy any agent. Copying an External Agent keeps its engine kind, Model Provider, environment variables, Extra Settings, and Response Schema; Instructions, Tools, Skills, MCP Tool Server, and Integrations are not copied. Check the copied model, capabilities, and project environment before running it.
Verify
Ask a question matching the agent’s responsibility and inspect its tool activity. If tools are missing, check bindings, the tool catalog, and Connection readiness. Increasing permissions does not fix missing configuration.
Implementation and references
3 - Connect external agents
Last updated:
When you connect an external agent, tools such as Claude Code, Codex, or Pi perform the actual work. AGW provides a shared interface for configuration, conversations, and workflows, so you can keep using familiar tools while managing how you use them in AGW.
Prerequisites: the matching CLI is installed on the execution node and works under the Server’s account and environment. Installing it on a browser machine is insufficient; container execution needs the CLI inside the container.
One external agent type, separate configurations
You can create multiple AGW Agent definitions that use the same external agent type, each with its own model selection and settings. For example, both of these agents run Claude Code, but serve different purposes:
| Agent in AGW | External runtime | Model | Purpose |
|---|---|---|---|
| Coding | Claude Code | model1 | Write and modify code |
| Review | Claude Code | model2 | Review code and suggest improvements |
For both definitions, select External → Claude Code, then choose a Model Provider pointing to model1 or model2, respectively. These model names are examples; replace them with models available from your service provider and compatible with the Anthropic protocol.
Selecting Coding or Review in Chat uses that definition’s model configuration. You can also use them in different Agentflow nodes, without repeatedly editing a single Agent definition to switch purposes.
This separation applies to the settings stored in each AGW Agent definition. It does not automatically create separate operating-system accounts or file environments. If a definition has no Model Provider selected, the model comes from the agent’s Extra Settings or the external tool’s own model configuration.
Configure
- Verify the CLI on the execution node and complete its authentication or model configuration.
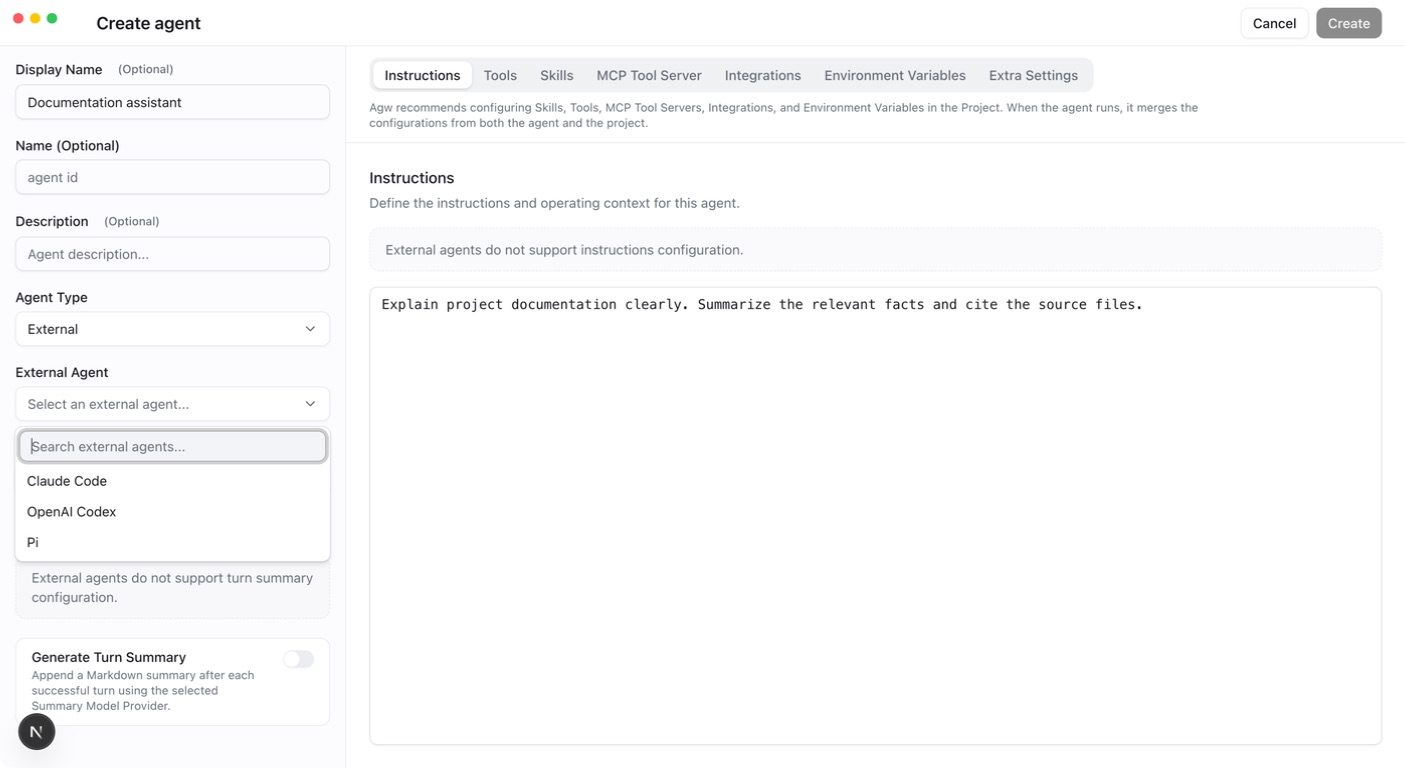
- In Agents, click Create, set Agent Type to
External, and choose the external agent kind. The kind cannot be changed after creation. - Select a Project and ensure its primary workspace is visible to the execution process.
- Optionally select a compatible Model Provider. Leave it empty to use Extra Settings or the external tool’s own configuration. Put other options for the external tool in the JSON object on the Extra Settings tab.
- Send a short task and verify the working directory, output, and permission mode.
Claude Code and Codex receive the Project’s additional directories through their SDK directory options; Pi receives the directory list in each turn’s context. All three start in the primary workspace.
| External agent | Optional Model Provider | Permissions |
|---|---|---|
| Claude Code | Anthropic | Uses the capabilities declared for this target |
| Codex | OpenAI Responses | Currently FullAccess only |
| Pi | All three provider protocols | Currently FullAccess only |
Changes and limitations
The Chat permission menu always lists all three modes and disables those the target does not support, with the reason shown; the server also validates them. Permission or definition edits affect the next turn. Active turns keep the configuration snapshot captured at their start.
Running an External Agent directly in Chat requires InProcess execution. In Distributed mode, including split Control/Data Plane deployments, such turns fail with “Distributed execution currently supports System Agents only.”
AGW’s Instructions, Tools, Skills, MCP Tool Server, and Integrations settings are not passed to any External Agent, including Pi, and those tabs cannot be edited in the form. External agents only receive existing User Memory as context. Configure and verify the external tool’s capabilities in its own environment.
If the CLI is unavailable, check its executable, account, environment variables, and Server logs. If a CLI works in your terminal but fails in AGW, check that the Server account’s PATH includes the executable.
Implementation and references
4 - Chat and execution history
Last updated:
Chat is where you send tasks to an agent or agentflow and inspect the results. Keep related questions in one conversation to retain the discussion and tool activity; start another conversation for a different topic.
Connect to the intended Server and prepare a working agent or agentflow. For an initial setup, follow Your first conversation.
An interaction
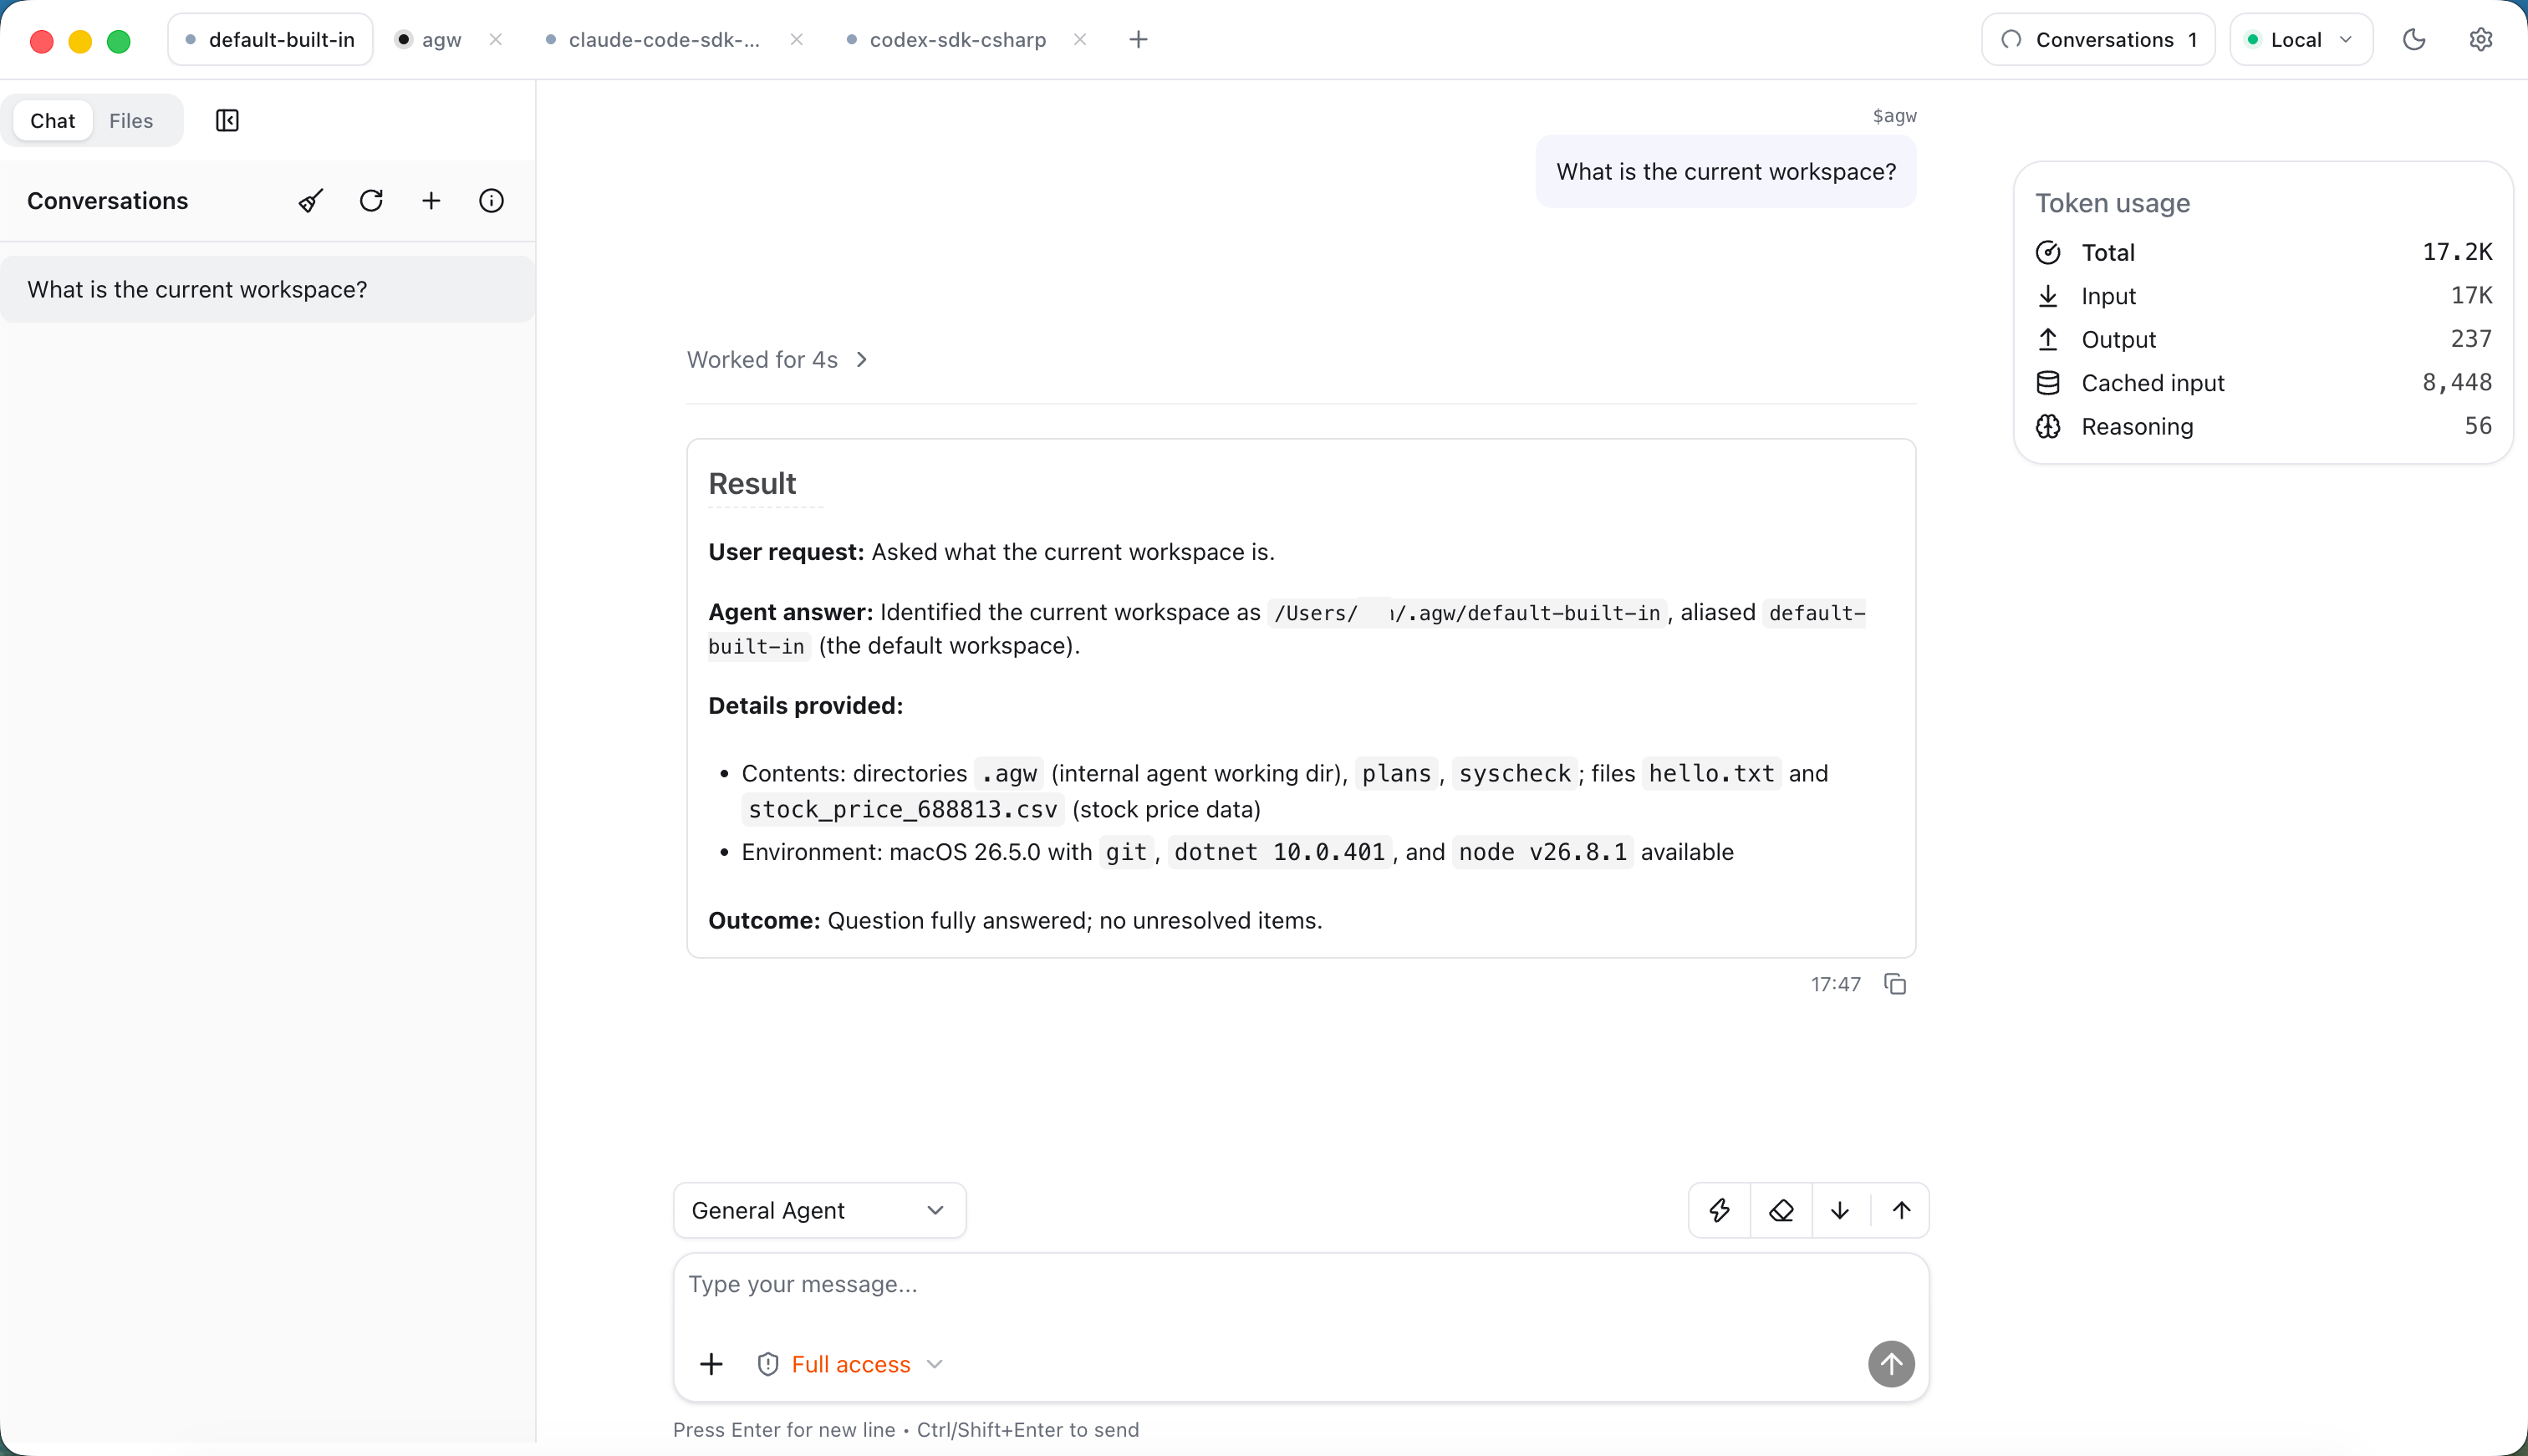
- Open Chat and select the Project: in Desktop, use the project tabs at the top of the window; in Web, use the dropdown at the top of the left sidebar. Then choose the execution target in the selector at the top-left of the message box.
- Enter the task, optionally attach images, and press Ctrl/Shift+Enter or click the send button. Enter alone inserts a new line.
- Read streamed output and tool activity. Handle approval or user input requests in the conversation.
- Review the conversation history and final execution state.
Web, Desktop, and Mobile accept text plus JPEG, PNG, GIF, or WebP images. Paste images in Web and Desktop; choose them from the photo library on Mobile. A message may contain up to five images, each at most 5 MB and at most 10 MB combined. Image understanding also depends on the model.
Message box helpers
| Action | Effect |
|---|---|
Type / at the start of a line or after a space | Shows command suggestions: available Skills and Tools for custom agents, or Claude Code’s slash commands |
Type @ | Searches files in the current Project, showing up to 8 matches |
| Arrow keys and Enter | Move through and select suggestions |
| + button | Turns on Plan mode (custom agents with the Mode ToolBlock) or inserts Skills and Tools |
| Lightning button | Opens Quick Text Insert to insert text maintained on the Quick prompts page |
| Permission menu | Chooses the tool permission mode; changes apply to the next turn |
| Go to latest message / Go to first message | Jump to the newest message, or load the full history and jump to the first message |
The Quick prompts page has My prompts (entries of the current user) and System prompts (visible to all users, editable only by the administrator). Web opens it from the navigation; Desktop opens it from Settings.
Understand progress
| What you see | What to do |
|---|---|
| Replies or tool activity keep arriving | Wait for completion and watch for errors |
| A tool approval request | Inspect the operation, arguments, and paths before deciding |
| A request for information | Answer in the current conversation so work can continue |
| Execution has finished | Check the reply and, for file work, the actual files or diff |
| An error or lost connection | Check execution state before retrying to avoid duplicate actions |
Icons in the conversation list show each conversation’s status: Running means it is still running, Last turn failed means the previous turn failed, and Last turn interrupted means the previous turn was interrupted.
After a turn ends with a Result, its tool activity and intermediate messages collapse into one “Worked for …” line that you can expand. Model reasoning starts collapsed; click Expand reasoning to read it. Hovering over a user message or Result shows its time and a Copy message button.
A successful execution still needs a result check. For a documentation edit, inspect the changes as well as the agent’s completion message.
Conversation list and settings
The top of the conversation list refreshes the list, deletes all history (Delete All History), and opens Conversation Settings through the Info button. Each conversation can be renamed or deleted.
Conversation Settings shows the conversation ID, message count, and creation and update times, plus two settings:
- Only Stream Turn Result: streams only each turn’s Result and automatically declines questions and tool approvals that need a person; the full history is still saved. It applies only to external agents and to custom agents with Generate Turn Summary enabled, starting with the next turn.
- Environment Variables: environment variables sent with each execution.
These settings are stored per Project in the current client, so another device or browser needs its own settings.
State and connections
Closing a page or losing a connection usually does not cancel execution. In InProcess mode, if the turn is waiting for an approval, user input, or a HumanGate when the connection drops, the Server interrupts it; in Distributed mode, a disconnect never interrupts execution. Use the explicit interrupt action to stop a task.
When the connection drops, the UI shows “Reconnecting to Server…” and retries automatically; click Retry now to retry immediately. After reconnecting, the client restores execution state; check whether the task is running, awaiting input, or finished.
Desktop gives each Server/Project/Conversation combination an independent execution connection. Switching Project tabs detaches the visible subscriber without automatically stopping background work. A status dot on each project tab shows background work, and closing a tab with a running task asks for confirmation first.
History
The server persists conversation and tool activity in batches. The Host template sets a 10-second flush interval; code falls back to five seconds when omitted. Live output that has not yet flushed is not confirmed durable history.
A conversation opens at its most recent messages, and scrolling up loads 50 older messages at a time. Desktop also offers user input navigation, which lists every user input in the conversation, including early inputs that are not loaded yet; selecting one jumps to it and loads older history as needed.
When a turn is interrupted or fails, unfinished messages and messages with fatal errors stay visible in the conversation but are excluded from later turns’ model context and from handoffs to another agent.
If the UI looks wrong, first check the selected Server and conversation, then pending input requests and Server logs. Workspace and permission changes take effect on the next turn.
Implementation and references
5 - Projects, files, and workspaces
Last updated:
A Project keeps a task’s directories, background information, and conversations together. For a code repository, you might create separate conversations for code exploration and troubleshooting while using the same workspace.
The account running AGW Server must be able to access these directories. Saving a Project creates a missing primary directory automatically; additional directories must already exist, use an absolute or ~ path, and not duplicate another directory. With a remote Server, enter a path on that host. With Docker, enter the path inside the container.
Configure the workspace
- Create a Project and set its Primary directory (required). In the Projects form in Settings, typing a name pre-fills
~/.agw/<project folder name>; when creating a Project from the Desktop title bar, leaving Workspace (optional) empty uses the same path. - Add Additional directories for other browsing roots. Each association has a stable ID; changing its path creates a new ID.
- In the Chat workspace’s Files view, switch roots with the directory dropdown and verify file and Git access; see File browsing and Git change review.
- Run an agent in the Project and verify that it uses the intended primary working directory.
The Project form also has Tools, Skills, MCP Tool Server, Integrations, and Environment Variables tabs. At run time these settings merge with a custom agent’s own configuration, which suits capabilities shared across the Project.
Switching the browsing root does not change the agent’s working directory. Removing an additional-directory association does not delete files. Mount network storage through the OS or container platform first, then configure the mounted path as the workspace.
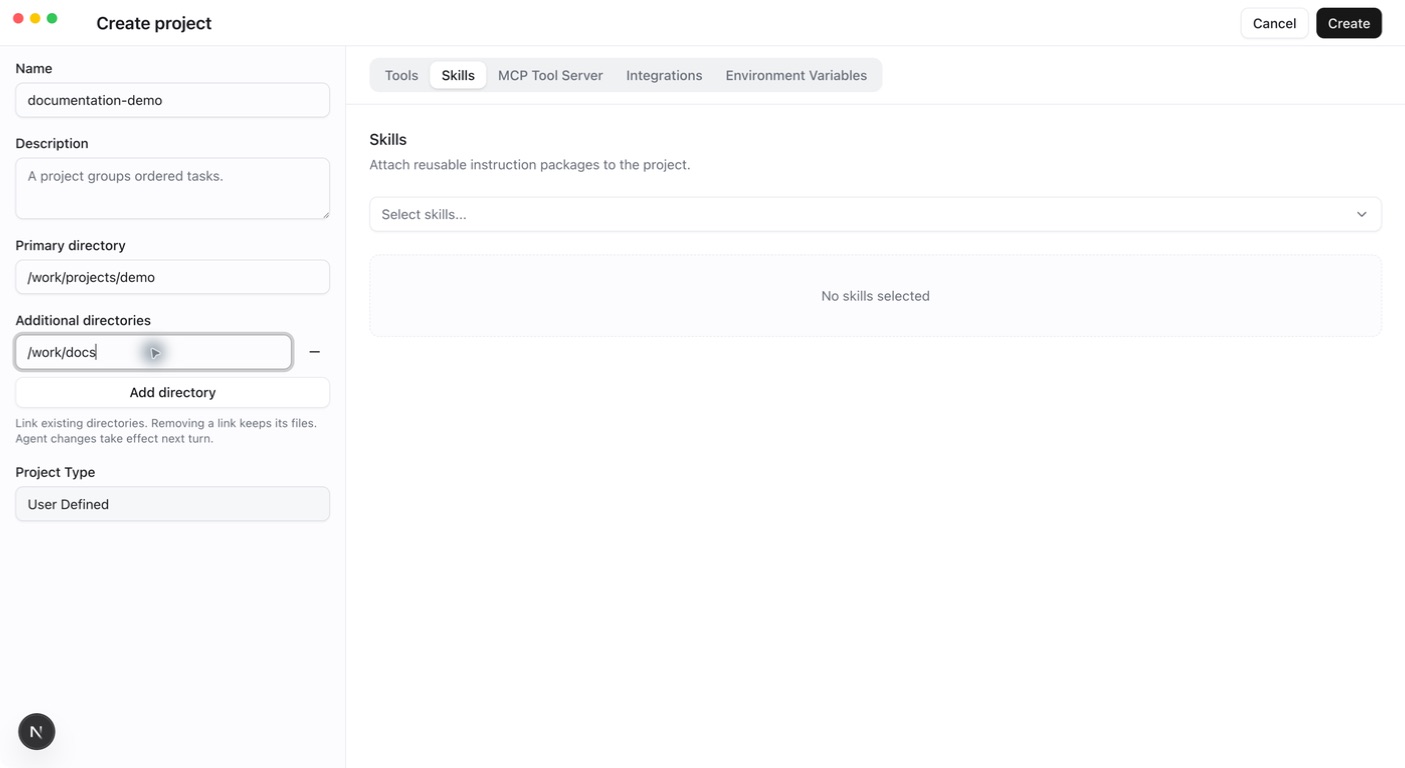
Example: code and reference directories
Suppose code is in /work/app and reference material is in /work/reference. Set the former as Workspace and add the latter as an additional directory. Browsing reference material in Files leaves the agent’s default working directory at /work/app. Tell the agent where the reference material is and give it the required reading capability.
For Docker, mount the directories first. If the host’s /home/me/app is mounted at /work/app in the container, enter /work/app as Workspace. Entering a path in the form does not create a container mount.
A custom agent’s instructions list the primary directory and each additional directory, using the folder name as an alias. In conversation, refer to a directory by its alias, or to the primary directory as default.
When a Project is created through the API without a workspace, the Server uses ~/.agw/projects/{projectId:N}, where {projectId:N} is the Project ID without hyphens.
When changes apply
Project updates invalidate the local filesystem cache and refresh file browsing immediately. Agents capture immutable directory snapshots at the start of each turn. Changes rebuild the runtime on the next turn while preserving conversation identity. Active turns, child execution, and durable recovery retain their captured paths.
Every distributed execution node must see the same captured host paths. An unavailable or foreign additional directory fails without falling back to the primary root.
Troubleshoot
For missing files, verify the selected browsing root, mount, execution account, and Server-side path. A different directory in your local terminal is not sufficient evidence. Non-built-in Projects can be copied. A copy keeps Tools, Skills, MCP Tool Server, Integrations, and environment variables, but its primary directory becomes ~/.agw/projects/{newId:N} and it has no additional directories; set the directories again after copying.
Implementation and references
6 - Agentflow
Last updated:
Agentflow means Agent Workflow: a workflow that connects several processing steps. One agent might prepare material, another review it, and a person approve the result. The canvas shows the steps, their inputs and outputs, and their order.
Verify each agent independently before connecting it. Start with one path from input to output, then add branches and approvals once it works.
Build the first flow
- Open the Agentflows editor and start with its single Input node.
- Add an Agent node, select a verified agent, and connect Input to Agent.
- Add and connect Output, save, then select the Agentflow in Chat and run it.
- After the basic path works, introduce HumanGate, branches, or parallel nodes.
The editor canvas has Undo and Redo buttons at its top right, also available as Cmd/Ctrl+Z, Cmd/Ctrl+Shift+Z, or Ctrl+Y. Drag the dividers to resize the node palette and Inspector. With unsaved edits, the dialog shows Unsaved changes and asks Discard unsaved changes? before closing; unsaved drafts are not kept after the dialog closes.
Each flow in the Agentflows list has an Enabled switch and Run, Edit, Copy, View Mermaid chart, and Delete actions. Run opens Chat in a side drawer using the built-in default Project, which suits a quick trial; to run it in another Project, select the Agentflow in Chat. Disabled agents and agentflows are not offered in the editor’s selectors.
flowchart LR
    I[Input] --> A[Agent]
    A --> H[HumanGate]
    H --> O[Output]
HumanGate pauses for a person. Input mode shows a Response box with Submit and Interrupt buttons, and the submitted reply can drive downstream predicates. Approval mode offers only Approve and Reject. Interrupt and Reject both stop the workflow.
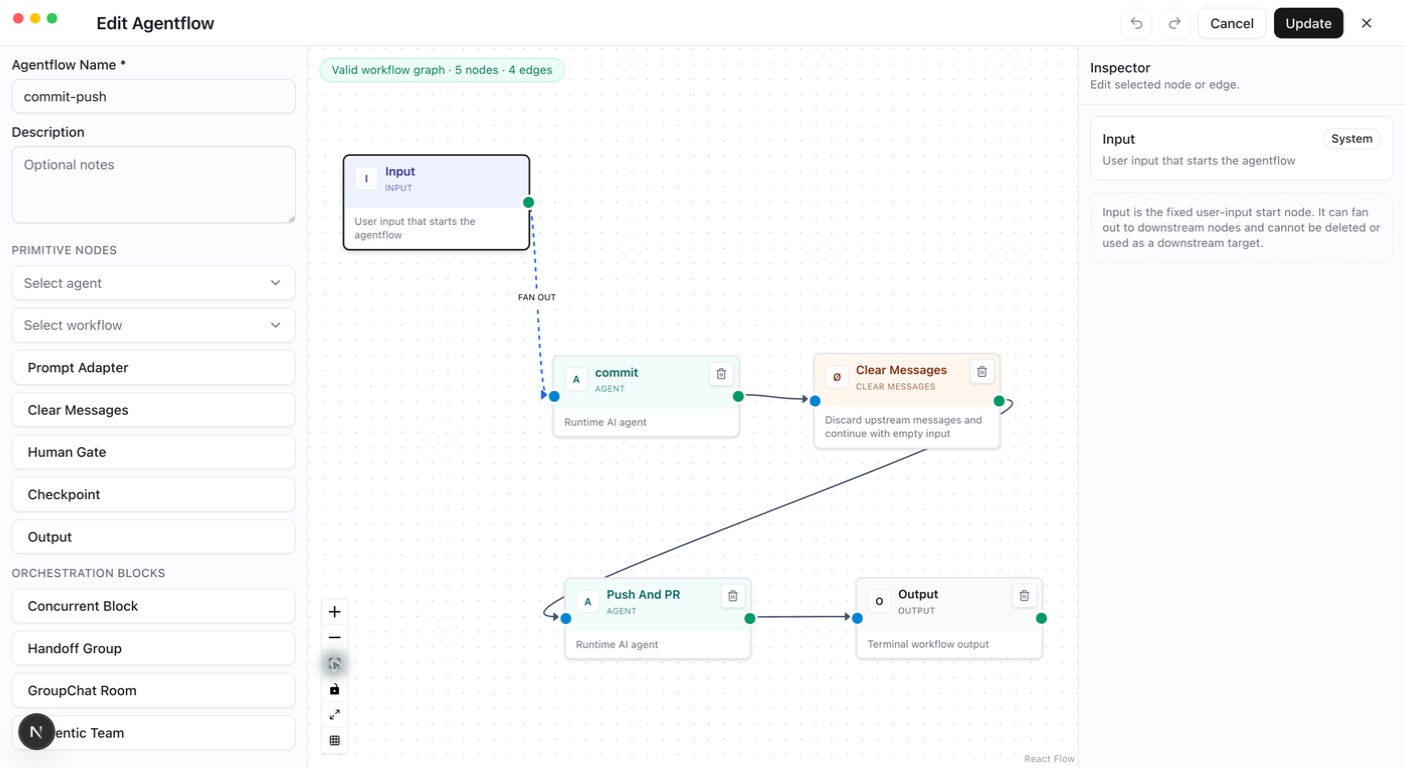
Primitive Nodes
Primitive nodes handle one step: receiving input, calling an Agent, adjusting messages, waiting for a person, or returning results. Select a node on the canvas, configure it in the Inspector, and connect it to its upstream and downstream steps.
Input: enter the flow
Input passes the current user request into the graph. For example, “Review these changes” enters here when sent from Chat.
Every flow has exactly one Input with the fixed ID input and no incoming edges. Connect it to one step or use Fan Out to send input to multiple branches.
Agent: perform a task
Select a configured Agent and optionally set the node name and instructions describing how to handle upstream results. For example, a code-review node can inspect incoming code and return problems and suggested fixes.
The node receives upstream content, runs the selected Agent, and passes its results downstream. The same Agent definition can appear in several nodes, each with its own model conversation history. Edges transfer task content rather than merging another node’s complete model session.
Verify the Agent’s model, tools, and workspace before adding it to a flow. Node instructions should also match the configuration supported by that Agent type.
Workflow as Agent: reuse a subflow
Use Select workflow to choose an existing Agentflow as a step. Upstream messages become its input, and its output returns to the parent flow. This suits reusable processes such as collecting material and producing a summary.
Verify the subflow independently before adding it to a parent flow or block. References between flows cannot be recursive: A cannot call B if B calls A. Separate branches may reuse the same subflow.
Prompt Adapter: add instructions
Use System Prompt / Instructions to describe how downstream content should be handled, such as “Respond with background, findings, and recommendations.” The node prepends these instructions to the current messages and forwards them.
Prompt Adapter does not call a model or perform translation, summarization, or data conversion itself. Connect an Agent after it to generate new content.
Clear Messages: discard upstream messages
Clear Messages discards arriving messages and continues downstream with an empty message payload. No model configuration is needed. For example, once an earlier step has written results to project files, the next step can read those files without carrying a large amount of upstream text.
It does not delete Chat records or clear a downstream Agent’s existing session history. The next step needs clear instructions or accessible source material and cannot rely on the discarded content.
Human Gate: request input or approval
Insert Human Gate where a person needs to confirm a result or provide information:
| Field | Usage |
|---|---|
| Human Step Mode | Choose Input to request information or Approval to request approval |
| Human Prompt | Explain what to supply or approve, such as “Confirm the release scope and list modules to exclude” |
Execution pauses until the request is handled through an interactive interface. In Input mode, a person writes a reply in Response and clicks Submit; the flow continues, and outgoing edge conditions can test that reply. In Approval mode, Approve continues the flow without any text. Interrupt and Reject both stop the flow. To return upstream for changes, use Input mode with a human reply and conditional routing.
For example, Agent → Human Gate → Output confirms a result. Conditions can also use agreed reply text to choose between revision and completion. Human nodes require a channel that can receive and answer interaction requests.
Checkpoint: save a recovery boundary
The Checkpoint node is called CheckpointMarker in code. Set a recognizable Checkpoint Name, such as “Research complete,” and place it where execution progress should be saved.
After this node, the system saves a complete workflow checkpoint at the end of the corresponding execution stage. Chat shows each saved checkpoint as a card marked Checkpoint; click Resume on the card to restore that save. The button is disabled with “This checkpoint is unavailable” when it cannot be resumed. Resuming selects one specific saved occurrence, creates a new execution branch from that state, and removes conversation records after the saved boundary.
Resume requires the same user, Project, conversation, and Agentflow, an unchanged flow definition, and no conflicting execution. InProcess checkpoints remain resumable only while the original runtime still holds the occurrence. Distributed mode persists checkpoints in PostgreSQL and supports recovery across disconnects or Server restarts. A checkpoint is neither a database backup nor a button to rerun any arbitrary node.
Output: return results and optionally summarize
Output emits arriving messages as flow results. A simple flow can connect Agent → Output directly.
A new Output node starts with Generate Summary on, and the flow cannot be saved until a Summary Model Provider is selected; turn the switch off when no summary is needed. With it on, an additional model call turns the results entering Output into a conclusion appended after them. Without it, the received messages pass through unchanged.
Orchestration Blocks
Blocks organize multiple participants into one step. Participants can be Agents or nested Agentflows. The node palette lists the four blocks as Concurrent Block, Handoff Group, GroupChat Room, and Magentic Team. Add a block, use its member controls to add participants, then click Open to inspect members and configure their names and responsibilities. Parent-flow edges connect to the block, which schedules its members internally.
| Block | Collaboration | Suitable tasks |
|---|---|---|
| Concurrent | Process the same input in parallel and wait for all results | Independent analysis or reviews from different perspectives |
| Handoff | Start with the first participant and transfer work as needed | Triage and specialist routing |
| Group Chat | Participants speak in order | Bounded discussion and iterative improvement |
| Magentic | A Manager plans and coordinates the team | Tasks requiring dynamic planning and delegation |
Concurrent: work in parallel
Add participants that can work independently, such as security and performance reviewers. The block sends the same input to every member concurrently, waits for all of them to finish, and combines their response messages for the next step.
Combining messages does not deduplicate opinions or generate a unified conclusion. Add a summarizing Agent afterward or enable Output summarization if needed. Use sequential edges for dependent steps, and avoid conflicting writes when members work on the same files.
flowchart LR
    I[Input] --> C
    subgraph C[Concurrent]
        A[Security review]
        B[Performance review]
    end
    C --> S[Summary Agent] --> O[Output]
Both reviewers receive the same input. The summary Agent processes their results after both finish.
Handoff: transfer work as needed
The first participant receives the task and can transfer it to another member according to their responsibilities. For example, a triage Agent routes a question to a billing or technical specialist. When the block finishes, its results continue downstream in the parent flow.
| Field | Purpose |
|---|---|
| Handoff Instructions | Explain when to transfer work and which participant should receive it |
| Return To Previous | Allow a transfer back to the previous participant |
| Autonomous Mode | Enable automatic continuation |
| Autonomous Turn Limit | Bound continuation turns in autonomous mode |
| Continuation Prompt | Prompt used for automatic continuation |
Define clear responsibilities and transfer conditions, and set a reasonable autonomous limit. Handoff does not guarantee that every participant runs. If every step must execute, sequential parent-flow edges are more direct.
Group Chat: take turns
Add participants and check their order. The current implementation schedules them in Round Robin order to contribute to the incoming task, stopping at Max Rounds.
For example, an author proposes a solution, a reviewer identifies problems, and the author revises it. Max Rounds bounds scheduling iterations; it does not mean that every member speaks that many times. The current default is 10 when unset.
Group Chat suits bounded collaboration with clear discussion rules. It does not automatically wait for consensus. Add a summary Agent afterward when a single conclusion is needed.
Magentic: coordinate through a Manager
Add participants and select a Manager. If none is specified, the first participant is the Manager and the others form the team. The Manager plans and assigns work based on the task. This suits work where initial research determines which follow-up analyses are needed.
| Field | Purpose |
|---|---|
| Manager | Participant responsible for planning and coordination |
| Max Rounds | Overall scheduling-round limit |
| Max Stalls | Limit tolerance for lack of progress |
| Max Resets | Bound replanning or resets |
| Require Plan Signoff | Require confirmation of the plan |
Give the Manager clear goals, completion criteria, and member responsibilities. Set round, stall, and reset limits appropriate to the task. Plan signoff requires an interactive execution entry point. After coordination completes, block output continues downstream. Execution does not guarantee a fixed participant order or a call to every member.
Planning and coordination usually require additional model calls compared with fixed sequential or parallel execution. When the steps are already clear, ordinary node connections or Concurrent are easier to verify.
Advanced Config JSON
Advanced Config JSON is the JSON representation of a node’s additional settings. It edits the same configuration as the Inspector controls. Start with the form, then use JSON to inspect or adjust the complete settings.
Use double quotes, literal true or false for switches, and unquoted numbers. Do not include comments or trailing commas. Enter one object, such as {}, rather than an entire workflow. Names, Agent or workflow selections, and System Prompt / Instructions have separate fields and do not belong here.
Primitive node fields
| Node | JSON fields | How to configure |
|---|---|---|
| Input | None | Fixed entry; no advanced configuration field |
| Agent | No dedicated fields currently | Leave empty or use {}; use the Agent selector and instructions |
| Workflow as Agent | No dedicated fields currently | Leave empty or use {}; select the subflow separately |
| Prompt Adapter | No dedicated fields currently | Leave empty or use {}; enter instructions separately |
| Clear Messages | None | No advanced configuration field |
| Human Gate | humanMode, humanPrompt | Interaction mode and user-facing prompt |
| Checkpoint | checkpointName | Use Checkpoint Name; no advanced configuration field |
| Output | None (configured through the Generate Summary UI) | Use Generate Summary and Summary Model Provider; no advanced JSON editor is shown |
Human Gate example:
Use input to request information or approval for approval. When unset, both the editor and the runtime treat the mode as approval. humanPrompt is the text shown to the user.
Checkpoint Name is stored as:
The Output runtime configuration currently has one field, enableSummary, but Output does not show an Advanced Config JSON editor. Configure it directly through the Generate Summary controls in the Inspector:
true(the value for a new Output node): after the main flow succeeds, use the selected Model Provider to append a Markdown summary to the final output.false: pass through the messages entering the Output without an extra model call. The Server also treats a missing field asfalse.
When summary generation is enabled, both conditions below must hold, or the editor’s save button stays disabled:
- The Output Inspector has a valid Summary Model Provider selected.
- The workflow has exactly one Output node; otherwise the editor shows “Summary requires exactly one Output node”.
The summary model receives the messages entering that Output. The editor provides no Instructions field for Output. The Model Provider is workflow configuration; adding modelProviderId or summaryModelProviderId to node JSON does not replace it, and arbitrary additional keys do not add Output capabilities.
Block members
All four blocks use participantNodeIds: canvas node IDs, not Agent definition IDs or display names. The editor provides Members, Max Rounds, Manager, and the other block-specific controls, so orchestration blocks do not show an Advanced Config JSON editor. The JSON below documents the shape those controls save; users do not need to enter it manually.
Replace the example IDs node-a and node-b with real Agent or Workflow as Agent node IDs in the current graph. Concurrent requires at least one member; Handoff, Group Chat, and Magentic require at least two.
Concurrent
Specify parallel members. There are no round-limit or Manager settings:
Handoff
The first member receives the task. handoffInstructions describes transfer rules; enableReturnToPrevious allows returning to the previous member; autonomous enables automatic continuation. The last two fields apply only when autonomous is true and specify its turn limit and continuation prompt. Both switches remain off when omitted. The example number is not a default.
Group Chat
Members take turns in array order. Set maxRounds to a positive integer limiting scheduling iterations; AGW uses 10 when omitted. It is not a separate speaking allowance for each member.
Magentic
managerNodeId must identify a listed member; the first member is used when omitted. maxRounds limits scheduling rounds, maxStalls controls tolerance for lack of progress, and maxResets bounds replanning or resets. Enter positive integers in the editor. requirePlanSignoff requests plan confirmation. These are illustrative values; omitted optional limits and signoff settings use the underlying workflow framework’s defaults.
Before saving
Check that member IDs exist, value types are correct, and each setting belongs to the current node. Advanced Config JSON is not a script entry point; arbitrary keys do not add capabilities. After editing JSON, check that the Inspector form shows what you expect, then save and verify with a small task.
Branch predicates go in an edge’s Predicate JSON. If / Else If edges do not show Advanced Config JSON; set branch order with Move branch up and Move branch down. Neither belongs in node Advanced Config JSON.
Routing and constraints
Exactly one Input must have ID input and no incoming edges. Runtime-visible nodes must be reachable from it. Node and edge IDs must be unique, with valid references.
Connections determine which steps run after a node finishes. Choose one in the edge’s Edge Type:
| Routing | Meaning | Design consideration |
|---|---|---|
| Direct | Continue to the next step | Use for a fixed sequence |
| Fan Out | Send input to several branches; every branch whose predicate matches runs | Branches should process the input independently |
| If / Else If | Check conditions in order and send the message only to the first match | Add an Else edge to handle unmatched conditions |
| Fan-in Barrier | Wait for every source in the group before continuing | Every required branch must be able to arrive |
Do not mix Direct, Fan Out, and If / Else If from one source. For example, If / Else If selects only one branch; a later barrier waiting for all branches may never receive everything it needs.
Controlled cycles are supported when graph safety rules are met. Verify exit conditions before adding nested workflows, orchestration blocks, and checkpoints so failures remain easy to locate.
Verify and inspect history
Test success, unmatched conditions, human rejection, and waiting paths separately. While the flow runs, Chat shows the input each node receives as its own input bubble in the current turn, keeping the upstream node attribution, so you can check execution order. CheckpointMarker identifies a full MAF checkpoint boundary; recovery is not an arbitrary restart at a chosen node. Keep a working flow before editing, and inspect execution records for node attribution.
Implementation and references
7 - Scheduled jobs
Last updated:
A Job runs an agent or agentflow at a scheduled time, such as for a routine check or recurring summary. Save its instructions, Project, and schedule; Server starts the task when due and records each outcome.
First verify the same task manually in Chat, including its model, tools, and directories. Server must stay running. In split deployments, Control Plane schedules the work and Data Plane executes it.
Configure a job
- Create a Job, choose its Project in Project ID, and choose the Agent or Agentflow to run in Agent ID. A job without a target still saves, but fails at run time and enters retries.
- Write its prompt, choose a Trigger Type, and enter the run time or trigger value.
- To change the name, failure retries, or enabled state, click Advanced at the bottom of the dialog and use Job Name, Max Retry Count, and Enabled. Max Retry Count defaults to 3 and new jobs are enabled; a blank Job Name is generated automatically.
- Test a future one-time job first. After Job logs and project execution records look right, create a separate recurring job. A successful one-time job pauses and disables itself; switching it to a recurring trigger or enabling it again does not make it run.
| Trigger | Example | Time semantics |
|---|---|---|
| Once | A future RFC 3339 timestamp, such as a UTC value ending in Z | Must be in the future |
| Interval | 00:15:00 | A positive duration in hours:minutes:seconds. The first run is 15 minutes after creation; each later run is 15 minutes after the previous successful run ends |
| Cron | 0 1 * * * | Standard five fields, evaluated in UTC; daily at 01:00 UTC |
Clients display local time, but Cron uses UTC. A past Once timestamp does not mean “run immediately.” If an Interval is not a positive hours:minutes:seconds duration, or a Cron value does not have five fields, an error appears below the field and the save button stays disabled. A five-field Cron with invalid field values is rejected by the Server on save with “Invalid cron trigger value”. After saving, check the next execution time in Next Run in the job list.
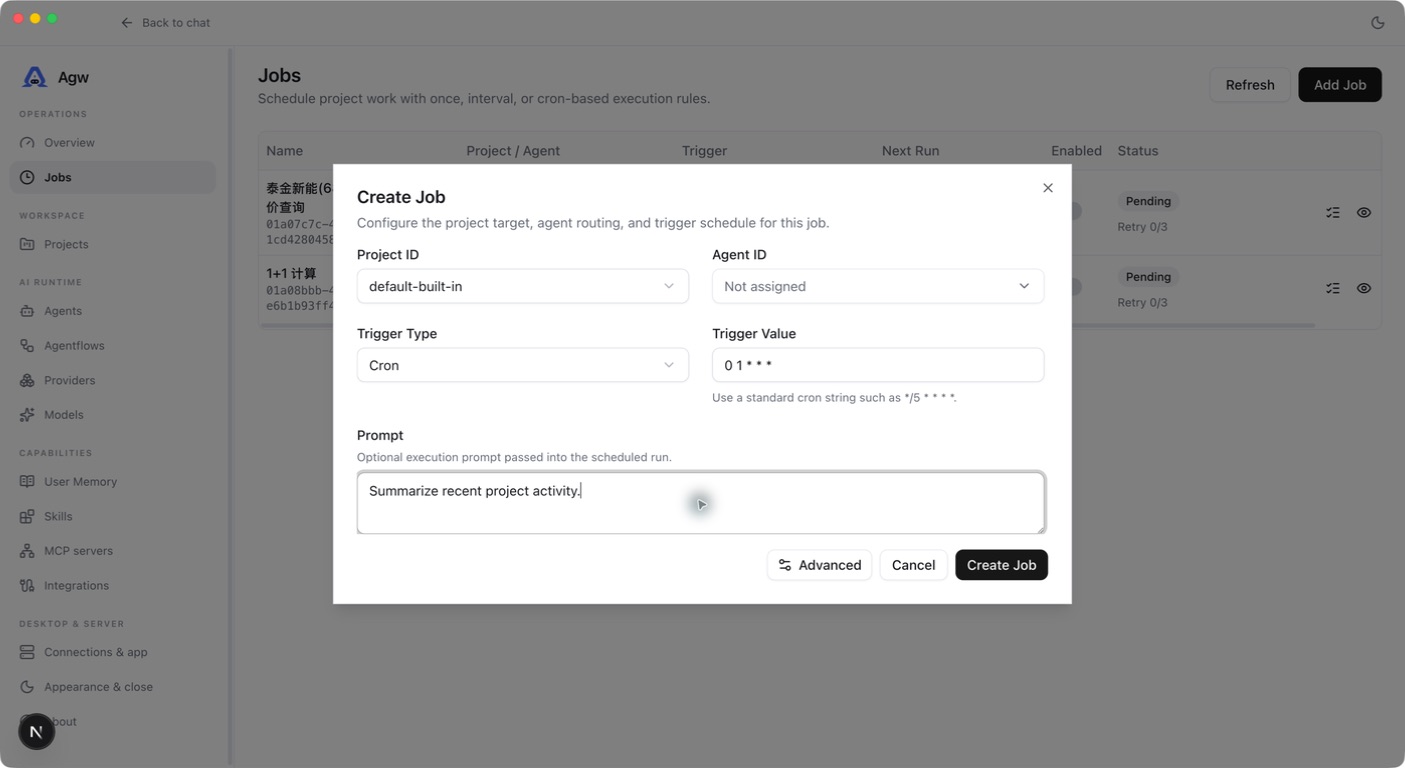
Write instructions that stand on their own
A scheduled task may run without anyone available to clarify it. Specify the source, time range, and output. For example: “Read this week’s project progress notes. List completed work, unresolved issues, and next steps. Say when records are missing instead of guessing.” Configure the target agent’s reading capability before use.
0 1 * * * runs daily at 01:00 UTC, which is 09:00 in Singapore or China Standard Time. After saving, check the next execution time in Next Run in the job list or details. A maximum retry count of 2 allows up to 3 attempts: the initial attempt and two retries.
Execution, retries, and pausing
Scheduled tasks in one Project run serially; different Projects can run concurrently. Each run starts a new conversation in the Project, runs with Full access, and automatically declines questions and approvals that need a person. Successful one-time jobs pause and disable themselves. Recurring jobs schedule their next run. A failed attempt is retried after 30 seconds, and MaxRetryCount excludes the first attempt. Exhausted retries pause and disable the job, and a recurring job schedules no further runs; fix the problem and create a new job to continue.
Each attempt records its time, result, and errors. Disabling a Job prevents later scheduling but does not interrupt an active run. Edits or deletion may be rejected until it finishes. The scheduler reads upcoming tasks in advance, so check the task state and execution records after rescheduling.
For missing runs, check initialization, enablement, next-run time, and target validity. Make external writes repeatable; a project lock is not an exactly-once guarantee.
Job Logs: inspect execution results
Job Logs records each execution attempt for a Job. Use it to check success, retries, and failure reasons. It contains execution outcomes; open Chat for full model replies and tool activity.
Open execution logs
- Find the task in Jobs and open its row’s logs action to enter Job Logs.
- Locate the relevant record by execution time and inspect its status, attempt number, and error.
- Select Go to Chat to open the conversation for that run and inspect its conversation and execution content. If the run has no conversation record yet, it opens the Job’s Project instead.
The task details view also exposes attempts and errors under Execution Logs. Back to Jobs returns to the task list.
Read the fields
| Field | Meaning |
|---|---|
| Status | Succeeded means the attempt completed successfully; Failed means it failed |
| Attempt | Attempt number within the current run: #1 is the initial attempt and #2 is its first retry, not the Job’s lifetime run count |
| Job ID | Identifier of the task owning these records; multiple records for the same Job share this ID |
| Time | Attempt start time and, when present, end time, displayed in the client’s local time |
| Error | Failure reason, or - when no error is provided |
| Actions | Open conversation content with Go to Chat |
For example, Failed / #1 followed by Succeeded / #2 for the same run means the first attempt failed and its retry succeeded. A recurring Job resets its retry count after success, so later records can show #1 again. Use timestamps to distinguish runs.
Troubleshoot with logs
- No records: check whether the task is enabled, its scheduled time has arrived, and it is still running. Records are written when an attempt ends and its outcome is recorded; an empty list does not necessarily mean scheduling never started.
- Failed execution: read Error, then use Go to Chat to inspect model replies and tool activity. Consult Server logs for model connection failures, tool errors, or unavailable workspaces.
- Success but an unexpected result: Succeeded means execution completed successfully. Still verify the output, generated files, or external actions against the task requirements.
- Failures remain after recovery: a successful retry does not remove earlier failure records. Check later attempts by time and inspect the Job’s current state.
Scheduled and background execution
Jobs run an Agent or Agentflow at a specified time, interval, or Cron schedule, for tasks such as periodic summaries and routine checks. Background Agents can delegate subtasks to other agents and retrieve their results later.
- Verify that the Project, target, and required tools work.
- Create a Job with instructions and a schedule for recurring work; configure Background Agents for delegated subtasks.
- Inspect status, results, and errors in task records and adjust the schedule as needed.
Closing Chat does not automatically cancel execution, but the Server and execution nodes must keep running. Background Agents cannot wait for new human approval. Unattended Jobs cannot automatically complete requests that need a real human answer or HumanGate decision. Ongoing execution does not guarantee seamless recovery after every restart; recovery depends on the deployment and execution mode.
Configure tools and Skills · Learn about memory · Check execution status
Implementation and references
8 - Tools and Skills
Last updated:
A Tool performs an operation, such as reading a file. A Skill supplies instructions, resources, and optional tools for a type of task. Decide what the agent needs to read or change, then select the relevant tools and guidance.
The steps below assume an existing custom agent and Project. External agents configure capabilities through their own supported mechanisms.
Add capabilities
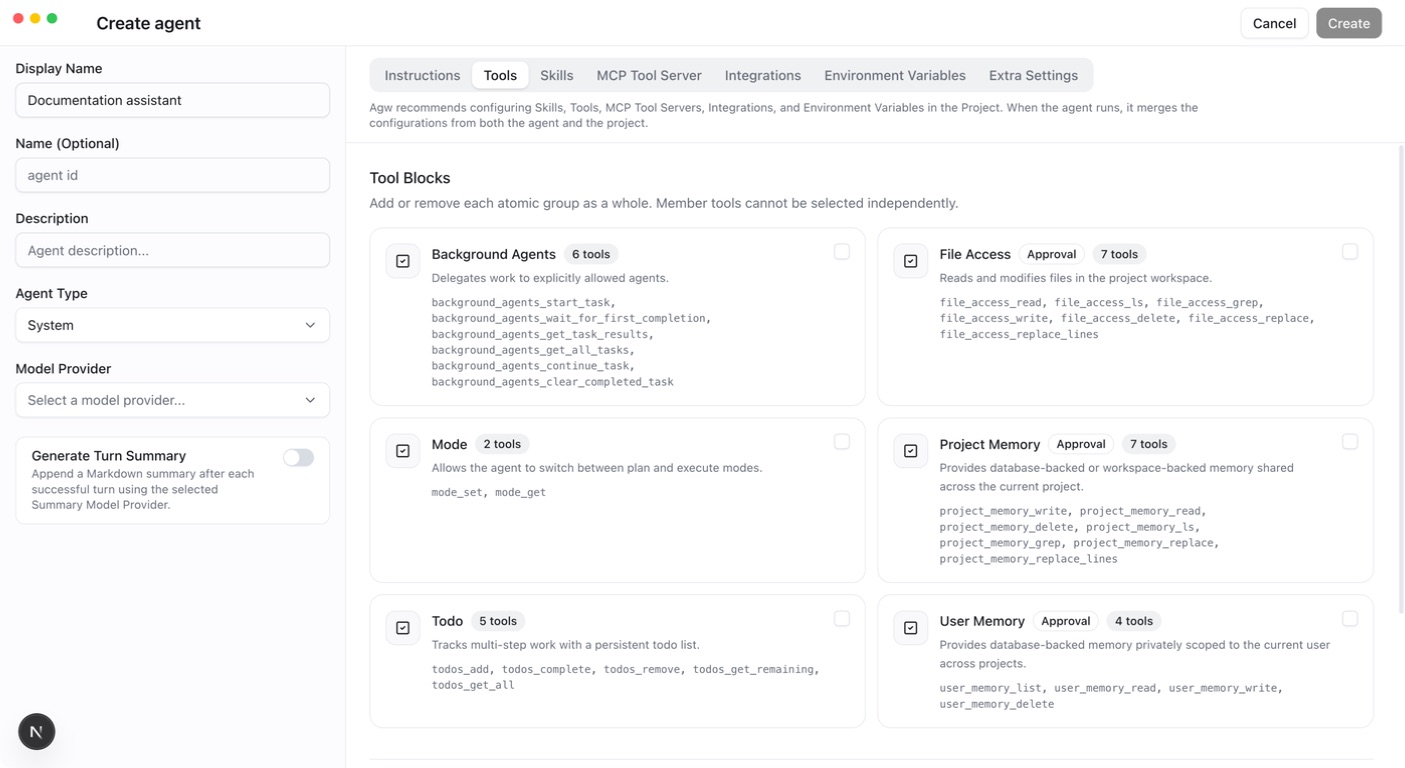
- Review the selectable tools in the Tools tab of an Agent or Project. ToolBlock cards show a description and member tools, plus an Approval badge when a call may need approval; individual tools appear in a dropdown with name, description, and category.
- Manage available Skills and read their instructions and prerequisites.
- Bind the tools and Skills needed for this task to the agent.
- Start a new turn in the correct Project. Verify read operations before testing necessary writes.
Every tool explicitly declares AgwToolPermission. The execution pipeline checks permissions; saying “allowed” in a prompt does not bypass permission or ownership checks.
Built-in ToolBlocks
| ToolBlock | Purpose | Configurable on |
|---|---|---|
| Todo | Tracks multi-step work with a persistent todo list | Agent, Project |
| Mode | Switches between Plan and Execute; see Plan and Execute modes | Agent, Project |
| File Access | Reads and modifies files in the Project workspace | Agent, Project |
| User Memory | Memory for the current user across Projects | Agent, Project |
| Project Memory | Memory shared across the current Project, stored in the database or the primary directory; see Memory | Agent, Project |
| Background Agents | Delegates work to explicitly allowed agents chosen in Allowed delegation targets | Agent only |
In File Access, file_access_read, file_access_read_lines, file_access_ls, and file_access_grep are read-only and allowed in Plan mode; file_access_write, file_access_delete, file_access_replace, and file_access_replace_lines require write permission.
Local and Remote Skills
Choose a mode according to how you maintain the content:
| Mode | Content source | How to update |
|---|---|---|
| Local | Upload a ZIP containing SKILL.md; files are stored on the AGW server | Edit the Skill and upload a new ZIP |
| Remote | Provide an HTTP or HTTPS URL that downloads a Skill ZIP | Update the remote content and let AGW refresh its cache; editing and saving the Remote Skill also fetches it again |
“Local” means the AGW server, not the computer running the browser. Remote refers to where the instructions come from; the Agent still performs the task.
- Create a Skill in Skills and select Local or Remote.
- For Local, enter a name and description and upload a ZIP containing
SKILL.md. For Remote, enter the ZIP download URL without uploading a file. AGW downloads it with an unauthenticated GET, so URLs that require sign-in or a token cannot be used. - A Remote package must contain exactly one
SKILL.md, withnameanddescriptionin its YAML frontmatter and instructions in its body. The remote file supplies the name and description. - After saving, select the Skill in an Agent or Project and use a small relevant task to verify that its instructions are available.
Remote Skills currently read the instructions from the package. They do not download and run its scripts or expose its other resource files. If those files are needed, use Local mode and prepare the execution environment.
Remote Skill cache
AGW fetches content when a Remote Skill is created or saved and caches it in the database for one hour.
- Reads reuse a valid cache to avoid repeated downloads.
- After expiration, the next read fetches fresh content. This is not an hourly background download.
- After updating remote content, wait for the cache to expire or edit and save the Remote Skill to fetch it again.
- A failed refresh returns an error. It does not extend the old cache’s lifetime or serve expired content. Check that the server can reach the download URL and that the ZIP and
SKILL.mdformats are valid.
During automatic refresh, the remote name must match the saved Skill name. If the remote name changes, edit and save the Skill to update its definition. Refreshing the cache does not rewrite content already loaded into a conversation; have the Agent read the Skill again when verifying updated instructions.
Skill-owned tools
Skill-owned tools are registered through the Skill and bound to the Project at runtime. They are not global catalog entries, so absence from the global list does not imply unavailability.
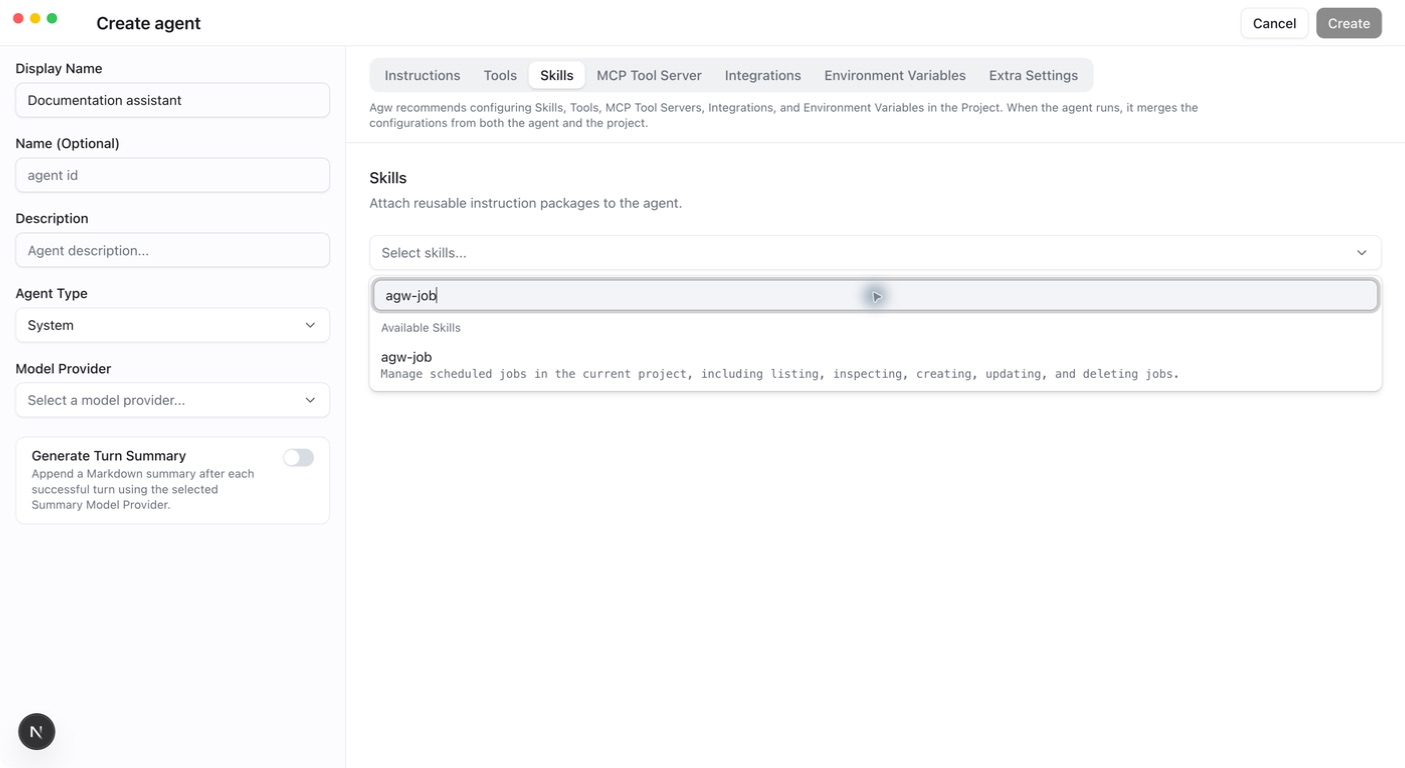
For example, agw-job supplies agw_job_list, agw_job_get, agw_job_create, agw_job_update, and agw_job_delete. Reads work in Plan mode; writes are prohibited there.
Verify
Inspect tool names, arguments, and results to confirm the intended Project was used. For missing capabilities, check Skill bindings and execution mode. For external services, configure MCP or Integrations.
Implementation and references
9 - MCP servers
Last updated:
MCP (Model Context Protocol) lets agents use tools from another service. An MCP server describes the operations it offers; AGW connects to it and makes those tools available to a custom agent. The available operations depend on the service.
Prepare the service’s launch command or URL, transport, and required credentials. The model itself is configured separately through a Model Provider.
Connect
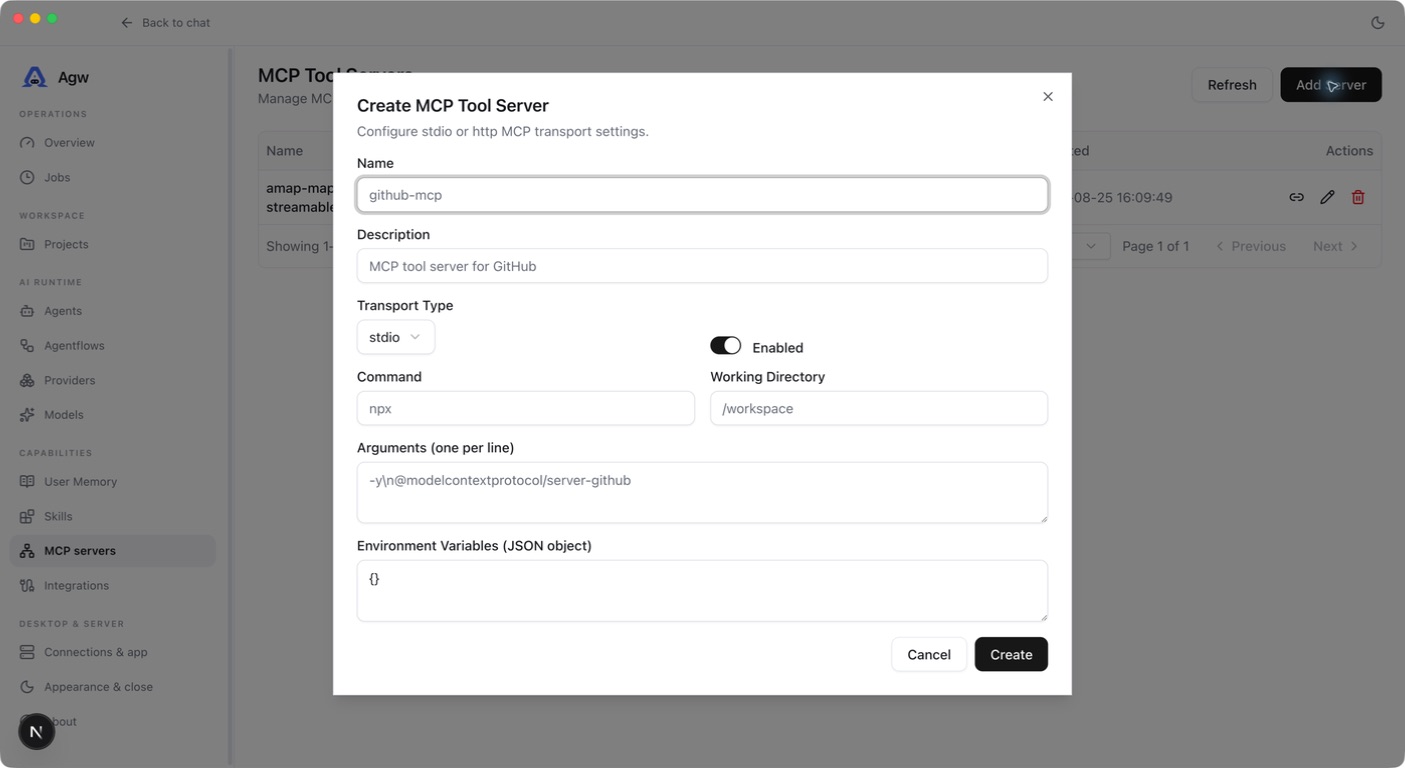
- On the MCP Tool Servers page, click Add Server, choose
stdioorhttpin Transport Type, and enter the command or endpoint and credentials the service requires. - Local-process servers must be launchable on the execution node; remote services must be reachable from that node.
- Click Connect and list tools in the list to check connectivity; success shows “N tools available”. Make sure Enabled is on, because disabled servers are not used.
- Bind the service in the MCP Tool Server tab of a custom agent or Project, then start a new turn. A run uses every server bound to the Agent and the Project.
- Inspect discovered tools and validate a read-only operation.
Directories, commands, and network access belong to the actual Server/execution node. Connecting a remote Desktop does not automatically expose locally installed MCP services to the Server.
Choose a transport
| Transport | How it connects | What to check |
|---|---|---|
| stdio | AGW starts a process and communicates through its input and output | The executable, arguments, and working directory exist on the execution host |
| http | AGW connects to an already running tool service. Choose http for SSE services too; AGW detects the HTTP transport the service uses | The URL and authentication are correct and reachable from the execution host |
A stdio command may work in your personal terminal but be unavailable to a Server running under another account or in a container. Check commands and environment variables in that environment. Test remote URLs from the execution host as well.
Relationship to Integrations
MCP is a tool protocol. An Integration provides catalog definitions, user configuration, credentials, and a Connection lifecycle. Integrations can themselves expose tools through MCP.
Plugin MCP supports stdio, HTTP, and SSE sources. Plugin HTTP/SSE sources that inject credentials must use HTTPS. Credentials are resolved within the invocation scope; keep them out of public URLs and prompts.
Troubleshoot
A server that cannot be reached at run time is skipped with a warning in the Server log, and the turn continues; an invalid or conflicting tool name fails the turn. When a stdio server starts, environment variables supplied by the execution override same-name values in the server configuration.
For missing tools, check bindings, launch commands, executables, network reachability, and credentials. Verify the service in the same execution environment before retrying a new agent turn. External CLI MCP configuration follows that tool’s mechanism and is not AGW Connection injection.
Implementation and references
10 - Configure integrations
Last updated:
Integrations let custom agents use authorized external accounts, for example to read information from GitHub. Configure several accounts for one service and choose which one an agent uses. The built-in catalog currently provides GitHub.
Prepare the required authentication details and check that the account can access the resources needed for your task.
From definition to connection
- Available integrations: global catalog definitions available for configuration.
- Configured integrations: accounts or service endpoints configured by the current user.
- Connection: the concrete instance selected and bound; one integration can have several accounts.
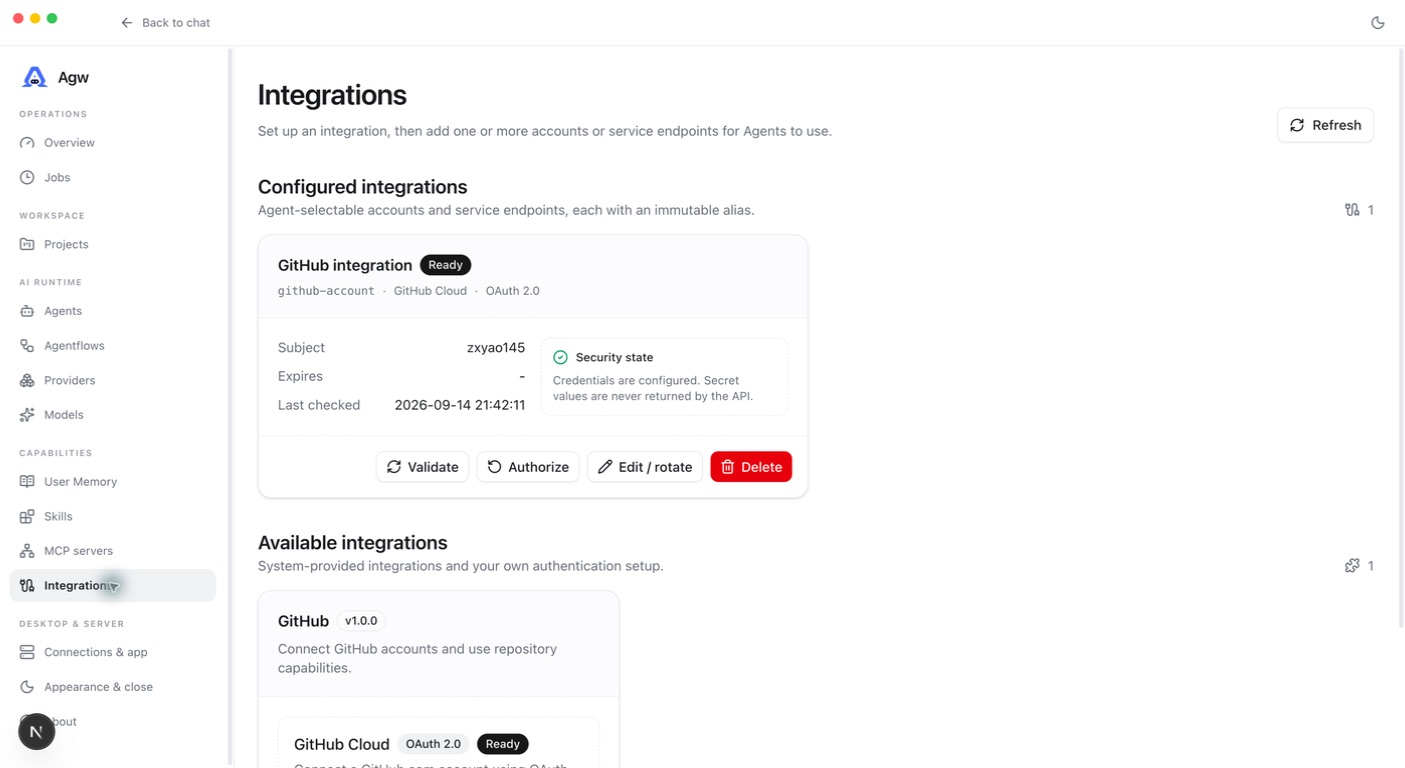
- On the GitHub card in Available integrations, click Configure and complete the setup required by the chosen authentication method. GitHub OAuth needs the Client ID and Client Secret of an OAuth App; register the OAuth callback URL shown in the dialog with that OAuth App.
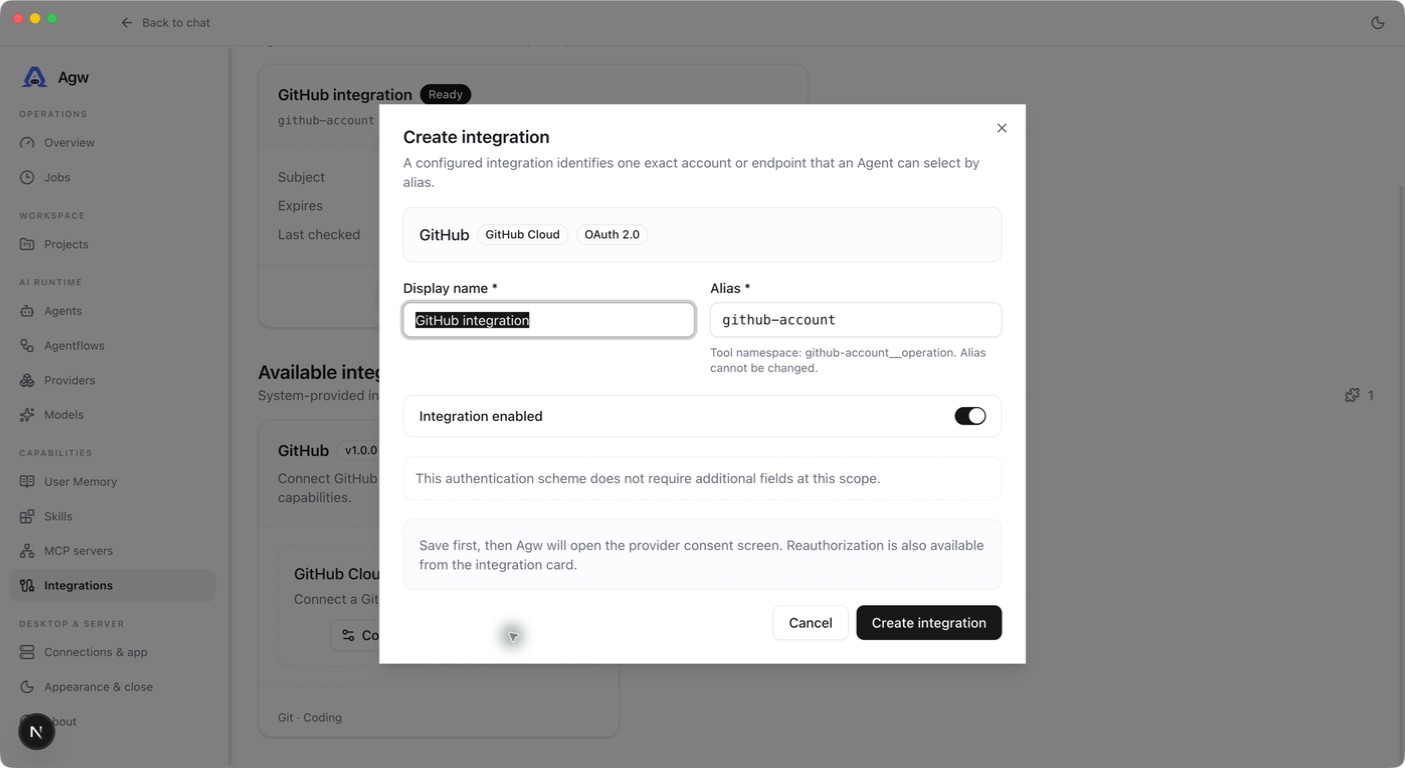
- On the catalog card, click New integration in the row for the authentication method you want, and enter a Display name and a clear Alias. After a new OAuth Connection is saved, AGW opens the authorization page automatically.
- Confirm it is Ready, then bind the specific connection to an Agent or Project. Use Authorize on the connection card to authorize again and Validate to recheck the connection.
- Run a read operation in a new custom-agent turn and verify the intended account is used.
Aliases are immutable after creation and unique per user. They allow only lowercase letters, digits, and single hyphens, up to 128 characters; uppercase input is converted to lowercase. Tool names follow {alias}__{operation} to distinguish accounts. A GitHub connection provides {alias}__current_user, {alias}__list_repositories, and {alias}__clone_repository, which read the current account, list visible repositories, and clone a repository into the current Project workspace.
Ownership and credentials
Installation setup and Connections belong to the current user. Setup changes invalidate only that user’s connections. Only owner-matched Ready connections contribute runtime capabilities. Credential access, OAuth, and tool invocation all check ownership.
Current limits
Remote Plugin Marketplace download, signing, and upgrades are unavailable. Third-party Plugin Skill scripts are not executed. Connections are not injected into any external agent (Claude Code, Codex, or Pi). Connection changes do not imply live mutation of an existing tool list; verify changes in a new turn.
Implementation and references
11 - Web, Desktop, and Mobile
Last updated:
Prerequisite: an initialized Server. Clients do not replace the Server-side model, file, or execution environment.
| Client | Connection | Use case |
|---|---|---|
| Web | Session Cookie from the administrator password or a third-party account; same-origin APIs | Browser management and chat |
| Desktop | API Key, entered manually or issued by third-party sign-in; multiple Server profiles | Local or remote daily workspace |
| Mobile | API Key, entered manually or imported from a configuration generated in Web; multiple Server profiles | Conversations and project access on mobile |
Connect
- For Web, open the Server URL, or port
3001during source development. - Desktop Full can use its bundled Server. In Client, open Settings → Connections & app, click + (Add remote Server), and enter Name, Server URL, and API token. A remote
http://URL requires ticking a consent box acknowledging that the API token and traffic cross the network unencrypted. - Configure Mobile with a Server URL reachable from the device and an API Key. Device localhost usually is not your development computer. Alternatively, create an API Key in Web under Settings → Server access, click Copy config, and paste it into Import Web configuration on Mobile. Deleting a Mobile profile does not revoke its API Key on the Server; revoke it in Web.
- Start a short conversation and verify the target Server, Project, and history.
Desktop centers on Chat; Projects and other administration routes live in Settings. Each Server profile uses an isolated cache. Changing its URL or API Key discards the old connection’s cache so data from different Servers does not get mixed.
Third-party account sign-in
When Server has identity providers enabled, the Web sign-in page shows account buttons and returns you to the page you requested. Desktop shows “Sign in with …” in the Server profile; the system browser completes authentication and Desktop receives its API Key without any manual paste. The same place offers “Sign out” to revoke that API Key. When the built-in local Server profile is in third-party sign-in mode without a usable API Key, such as after signing out or expiry, it also shows “Use local administrator”.
Mobile has no third-party sign-in and uses an API Key entered manually or imported. Each third-party account is a separate user whose data stays apart from the administrator account. See Configuration and authentication for setup and Third-party account sign-in for behavior.
Runtime differences
Desktop renderer uses its own port 3000 and does not require the Web development server. Full’s Server daemon continues after the desktop window closes; closing minimizes to the tray by default.
Mobile uses Expo with native projects generated through CNG. These docs provide the source-development path, without assuming an app-store package exists. Use HTTPS for remote access and ensure the proxy supports execution WebSockets.